Pages

Showing posts with label Gifts from the Kitchen. Show all posts

Tuesday, 22 January 2013

Chocolate Raspberry Balsamic Truffles


I love chocolate especially when I can sink my teeth into it.  Nothing screams chocolate more than Truffles!  Before Border's Books closed my daughter and I would frequent there to purchase books, magazines, videos, etc.  At the checkout line we could never resist the Lindt Truffles - purchase 3 for a special price.  My favorites were the raspberry and dark chocolate.

Truffles are quite pricey for just one small orb but that one can satisfy me for hours.  I use to think there was special magic in creating them, but they're the simplest and most elegant chocolate treat to make.  Of course, the ingredients you use can take them from ordinary to extraordinary!  Purchasing the very best chocolates is key but of course not essential.  Even a bag of chocolate chips will do the trick but for a special occasion I recommend going all out to find the smoothest tasting chocolates.

I decided to play around recently with my creations using vinegar's infused with various fruits from a store that recently opened nearby called DiOliva's.  To my surprise my Chocolate Raspberry Balsamic Truffles tasted exactly like the Lindt ones I've had in the past.  With my recipe yielding about 18-20 truffles I can afford to serve these at parties - like Super Bowl coming up, or even to give as gifts for Valentine's Day.  

If you're a fan of chocolate you'll have fun making these truffles.  Be creative and add your favorite flavors.  Some of mine are the Balsamic Vinegar's I've used at DiOliva's like: Raspberry, Strawberry, Fig, Blueberry and even the white Cranberry Walnut Balsamic.  

What are you waiting for?  Give these a whirl!  Who says your Super Bowl party has to be all fried grub food?  Add some decadent sweets to the table and create batches to give for teachers gifts, and gifts to family and friends for Valentine's Day.  Everyone is sure to love them - that is of course if they love chocolate!

Here's my recipe........

Chocolate Raspberry Balsamic Truffles
yields 18-20

Ingredients:

2/3 cup whipping cream
12 ounces chocolate (using a sharp knife shred the chocolate into fine pieces or use chips)
1/4 cup unsweetened cocoa powder (sifted - I used Ghiradelli)

Directions:

Bring cream to boil in heavy duty saucepan.  Remove from heat.  Add chocolate shavings or chips and whisk until melted and smooth.  

Whisk in Raspberry Balsamic Vinegar.  Pour into medium bowl.  Cover and chill until firm - 2-3 hours.  

Line a baking sheet with parchment, foil or waxed paper.  Using a teaspoon place a rounded scoop onto prepared baking sheet.  Freeze until firm, about 45 minutes.  

Place sifted cocoa in a bowl.  Roll truffles between hands into rounds.  Roll gently in cocoa.  

Cover with plastic wrap and chill until ready to serve.

Note:  
  • If you don't want your truffles flavored, simply replace the flavored vinegar's with pure vanilla extract. 
  • Truffles can be rolled in chopped nuts, coconut, sprinkles or gold dust, or whatever suits you.

Enjoy!!!

Monday, 19 November 2012

Candied Pecans


For as long as I can remember I've been making Candied Pecans.  I make them to have around the house when company is coming, add them to salads, as toppings for desserts or just to eat them plain - they're so good! I especially love giving the Candied Pecans as a holiday gift, packaged in cellophane bags tied with colorful ribbons.

If you've never made Candied Pecans this simple recipe takes no time at all.  Once made look out - your family will gobble them up in minutes, literally!

Here's the recipe.....make a batch for Thanksgiving, everyone will be thrilled you did.

Candied Pecans


1 cup sugar
1/2 cup water
1 tsp ground cinnamon
Dash of ground cloves
2 cups pecan halves 
1 tsp pure vanilla extract


Combine first 4 ingredients in a medium saucepan. 

Cook over medium heat until sugar dissolves, stirring constantly (about 8-10 minutes).


Add pecans and vanilla, cook until all syrup is absorbed and pecans are coated, stirring constantly (about 12 minutes - will look powdery).


Spread pecan mixture on a baking sheet lined with parchment. (Pecans will have a sugar coating)


Cool completely then store in airtight container or serve.


Yields approx. 3 1/2 cups

Enjoy!!!

Sunday, 11 November 2012

Cranberry Orange Pistachio Biscotti


With the holidays quickly approaching, all I feel like doing is baking - cakes, cookies, pies, and biscotti.  I love biscotti and never feel stuffed after eating one or two.  I love them with my coffee, tea or even as a midday snack.  They're so light and delicious!

A favorite recipe I've been making for years is Cranberry Pistachio Biscotti.  After viewing a biscotti recipe on one of the many blogs I frequent, I decided this morning when I woke up that I was going to make mine -  however, I thought I'd change it up a bit.  

I had some delicious Blood Orange Olive Oil that I purchased from a store that recently opened  at Plaza Frontenac in St. Louis, called DiOlivas.  I love Olive Oil and Vinegar stores as you're probably aware, if you've been following my blog for a while.  With a myriad of choices, each one delicious and unique in their own way (I was able to sample whatever I wanted), I walked out with quite a few varieties to take home and create, culinary masterpieces!

DiOlivas is a locally owned family business, so if you live in or around the St. Louis, Missouri area you should definitely pay them a visit.  If not, you can always purchase their products online - everything I tasted was so good, you can't go wrong with any of them.

So, this morning I decided to make biscotti.   Instead of my usual recipe that I often make during the holidays, I decided to use my Blood Orange Olive Oil instead of plain Olive Oil, plus, add the zest of an orange.  

OMG!  You have no idea how moist and delicious these were!  Even my daughter said they were the best biscotti I've ever made.  

So of course I knew I had to share the recipe with you.  I know you're going to love them.  Besides making them for yourself, don't forget to package some up to give as a holiday gift.  Who wouldn't love these?


Cranberry Orange Pistachio Biscotti
Makes approximately 28-30

¼ cup DiOlivas Blood Orange Olive Oil
¾ cup sugar
2 teaspoons Pure Vanilla
½ teaspoon almond extract
2 large eggs
½ teaspoon salt
1 ¾ cups, unbleached flour
1 teaspoon baking powder
½ cup dried cranberries
1 ½ cups pistachio nuts, shelled
Zest of one Orange

Preheat oven to 300F degrees.  Spray cookie sheet with non-stick spray and line with parchment paper.

Using an electric mixer, blend olive oil and sugar together. 
Then add vanilla and almond extracts and eggs, beating until the mixture is completely blended.

In a small bowl, whisk together flour, salt and baking powder until thoroughly combined.  On low speed, gradually add to the egg mixture.  Fold in orange zest, pistachios and dried cranberries.

Divide dough in half.  On the cookie sheet, form each half into a log about 12 inches long and 2 inches wide.  Space logs about 4 inches apart.  (Dough will be sticky so lightly moisten hands in cold water before forming into logs).

Bake in center of oven for 35 minutes or until the logs are light brown.  Remove from oven and turn heat down to 275F degrees.  Let logs cool on baking sheet 10 minutes.

With a large metal spatula, remove the logs to cutting board and using a long, sharp knife, cut each log on the diagonal into ¾ -inch slices. 

Stand slices upright on cookie sheet and return to oven for 8-10 minutes, until they are light brown.


Cool biscotti on rack and store in a tin between sheets of waxed paper.  They can be kept at room temperature for up to 2 weeks.

Enjoy!!!


Monday, 24 September 2012

Homemade Vanilla Extract!


The holidays will be here before you know it.  If you receive my monthly newsletter then you're aware that the next few months I plan to share recipes for homemade "gifts from the kitchen," that you can give as a hostess, shower or holiday gift. 

Most of us enjoy giving gifts to family, friends and co-workers during the holiday season, but with the economy in the toilet it makes it a bit harder on the pocketbook!  However, creating homemade treats is not only affordable but it tastes better.  Plus, you can afford to give to everyone on your holiday list and then some, and still have money leftover to throw a party!  

Last week I shared how to make homemade Limoncello.  Today I'm going to share how to make Homemade Vanilla Extract.

If you're a baker then you know how often you use Vanilla Extract.  Pure Vanilla Extract which is what I'll be sharing with you, can be $10-$15 for a 4 ounce bottle.  To make your own it's a fraction of the cost.  Plus, I even had labels made for mine - I'll share that with you in a minute.

Homemade vanilla extract is so easy and fun to make. It's not as strong as the store bought varieties but will have a fuller and fresher flavor. The best part though, is knowing you made it yourself. 

It doesn't matter what alcohol you choose for making extract - it's more a question of which alcohol you prefer. The flavor of Vodka doesn't interfere with the taste of the vanilla and is what you'll typically purchase in the stores.  However, Rum or Brandy can also be used and are nice if drizzled over freshly baked cakes or added to stewed winter fruits.

When I decided to make homemade vanilla I opted to order amber colored glass bottles from Specialty Bottle Company, although you can purchase Vintage Bottles which can be fun, or clear bottles.  Since you're making these yourself, whatever bottles or vessel you choose is up to you.

For the Vanilla Beans I purchased in bulk, which saves you quite a bit.  I ordered 50 Madagascar Vanilla Beans from Beanilla for a mere $38.99. I love the aroma of the Madagascar Vanilla Beans and prefer those for making homemade extract and to use when baking.  If you're partial to another type, Beanilla offers a variety to choose from.

Madagascar Vanilla Beans are superior, with flavor and aromatic qualities that make these beans the most popular and sought after vanilla variety. The flavor is rich, dark and creamy with an overwhelming sweet, buttery aroma. These are well suited for many baking recipes, drinks and desserts. To learn more about the various vanilla beans; the best types, how to store them, how to use them, how they're graded and what makes them different, view here.

Of course, to make your gift complete there's nothing like a fancy label to adhere to your bottle.  If you're talented you can easily make your own.  However, if you're like me and don't have the time or don't have the technical skills, you'll love going to My Own Labels.  They literally have labels for everything.  

Be sure to check out each of these sites. I'm sure you'll have fun browsing and may even find something you like, whether for Homemade Vanilla Extract or some other gift your creating.

Below is the recipe for Homemade Vanilla Extract - I hope you have fun with it!.............. 


Homemade Vanilla Extract

Supplies Needed:


Labels (optional)

Vodka
Vanilla Beans (I used Madagascar)
Bottles with a tight fitting lid
Scissors or paring knife
funnel

Directions:
Split vanilla beans lengthwise (using a scissors or paring knife), down the center to expose the seeds,


 keeping the ends of the beans intact. The seeds inside the vanilla bean are called the "caviar."


Place one full split bean, folded in half, in a 4 ounce bottle. I use one bean per 4 ounce bottle and feel it's enough.  If you like you can add 2 beans for a fuller flavor.

Note: Five beans per 16 ounces of alcohol is the ratio that the FDA requires for commercial production of a single-fold vanilla extract.  This ratio is the most important aspect of making homemade vanilla.


Using a funnel, fill with high-quality vodka, rum or brandy, covering the top of the beans.


Seal bottles and let steep for 6 to 8 weeks in a cool, dark place such as a pantry. Shake the bottle 1-3 times a week, until  ready to use. The extract will last practically forever.

Eventually, the beans will lose their strength, but they should maintain their flavor for many months.  Add more alcohol as needed to keep the bottle replenished - you will never run out of extract.  At some point you might want to add a couple of split fresh vanilla beans to the bottle.


ENJOY!!!


Monday, 10 September 2012

Giveaway & How to Make Limoncello!


In June of 2007 we took an extended vacation to Italy. We started in the northern part of Italy - Milan, and made our way to the southern tip of the Amalfi Coast - Sorrento. Exhausted by the end of the month, the Amalfi Coast was the perfect setting for relaxation.

The turquoise waters were breathtaking and crystal clear.  We traveled by boat or ferry to many of the nearby islands for a taste of what each had to offer.  Universal, was the famous Limoncello (Lemon Liqueur), displayed in every shop on the coast in tall skinny neck bottles, with bright yellow liqueur filled to the brim.  Lemons grow in abundance on the Amalfi Coast and Limoncello is just one of the many things they use them for.

A famous culinary school in Ravello on the Amalfi Coast is Mamma Agata's Cooking School.  Although I was unaware of her school at the time, I was fortunate enough to discover it online years later.  I hope to make my way back someday soon to take one of her classes, and even arrange a culinary tour where others will join me.

Mamma Agata's cooking course is held in a state-of-the-art outdoor kitchen on a terrace in Ravello. The town of Ravello is located high above the Amalfi Coast, with views that stretch to Capri and beyond.


It is a town famous for its music and culture as well as gastronomic events.

Mamma Agata has a vast experience in traditional southern Italian cuisine.


Her life experience includes cooking for both Italian Heads of State and American celebrities that frequented Ravello in the 1950's and 60's, such as Humphrey Bogart, Elizabeth Taylor, and Jacqueline Kennedy and many others. She has been a private chef for international journalists, writers and politicians such as Susanna Agnelli.

Papa Salvatore married Mamma Agata in 1964.  They met at Villa Civita when Mamma was 14 years old, where Salvatore worked as a driver and a part-time gardener, and Agata worked as a personal cook. He later left Villa Civita to start a career as a waiter in a hotel restaurant.  After much hard work and long hours he became the Maitre d'hotel and continued in the business for more than 40 years.  It was with Salvatore's expertise gained through the hospitality industry that gave their family the essential knowledge, vital to opening the cooking school - which they call their Hidden Treasure.


Now Salvatore spends Monday through Saturday from 7:30am - 8:00pm working in the gardens with short breaks for lunch in the heat of the day, then still finding time to take care of their farm animials.  It is through his hard work, nurturing, passion, and devotion that their Hidden Treasure produces the most genuine organic vegetables, fruits and herbs, allowing Mamma Agata to create incredible dishes for her family, friends and guests.  Papa Salvatore is the families REAL TREASURE!

Chiara Lima, Mamma Agata's daughter, also lives in Ravello on the Amalfi Coast, where she teaches classes along with her mother, sharing her experiences with others.


Chiara is married to Gennaro who is the Sommelier of the family - with whom they share two lovely children - Mario and Paola.


Upon discovering Mamma Agata's cooking school I browsed their website and found they've published a beautiful cookbook that I'm thrilled to say I use in my kitchen to create luscious masterpieces, while reading their wonderful family stories at bedtime.  I feel like I know each member of their family, yet I've never met them.

I have communicated with Chiara numerous times and look forward to the day I finally meet her.  She is so warm and kind I feel like I've known her forever.  Everyone should be like Chiara!


Besides their cooking school and beautiful cookbook they also make their own olive oil, and pasta, among other items in their shop. I planning to make their Farmer's Spaghetti next, then drizzling the Extra-Virgin Olive Oil over the top - a dish I'm certain my family will adore.

With so many incredible Italian family recipes in this book, I'm finding myself like Julie Powell (Julie & Julia) following each and every recipe, page by page.  Recipes like Eggplant Parmesan with homemade tomato sauce, eggplant rolls (I love eggplant), stuffed zucchini flowers, Gnocchi - various versions,


numerous pasta dishes each one more tempting than the last, risotto, pork, veal, Mamma's famous Lemon Chicken, mouth watering meatballs in tomato sauce, vegetable dishes, her famous Lemon Cake and so much more.


Plus, their special Limoncello that I'm going to share with you today.

Even more, are the beautiful photos on every page, with stories to go with them.  I have to say, each time I see the photos of Chiara and Gennaro's children displayed throughout the pages of this book, I smile.  They are positively beautiful and look so sweet.

I can't say enough about Mamma Agata "Simple and Genuine" cookbook.  I love every page, photo and story that is shared.  It's truely a book to cherish!

I'm excited to tell you that Chiara was kind enough to let me offer one as a GIVEAWAY today!

However, if you don't win, you can always purchase a signed copy of Mamma Agata "Simple and Genuine" directly from Mamma Agata in Ravello, Italy.  Plus, if you'd like to see Chiara and Gennaro cooking, you can view their videos here.

Here's what you need to do to enter the GIVEAWAY:    Plus read more for the Limoncello recipe!


  • "Like" Mamma Agata on Facebook
  • "Like" At Home with Vicki Bensinger" on Facebook & Pinterest
  • Tell me what your favorite Italian dish is - (MANDATORY)
By commenting each time that you did one of the above, it will increase your chances of winning.

The winner will be selected at Random on Sunday, September 16th.  Be sure to leave a link to your email address so I can reach you, in the event you are the winner.

I won't keep you in suspense any longer.

I decided to share Mamma Agata's recipe for Limoncello today, since the holidays are just a little more than 3 months away.  I love gifting homemade treats for the holidays, they mean so much more than store bought.  Plus, it's an affordable way to give to so many, and with great results.  I know you'll love this for yourself and to share.

Homemade Limoncello


You will need a large glass jar

Ingredients:
  • zest of 6 or 7 large organic lemons
  • 1 litre or quart of pure grain alcohol or vodka
  • 5 cups (1250 ml) water
  • 3 cups (700 gr) sugar


Instructions:
Peel the zest from the lemons with a vegetable peeler and place them into a large glass jar.


Try to avoid the bitter white pith of the lemon skin, under the yellow zest.

Add the alcohol to the jar with the lemon zest.


Cover the glass jar with plastic wrap and store it in a cool place for 7 days.

On the sixth day: 
  • Boil the water and add the sugar to the boiling water (creating simple syrup).
  • Stir the sugar until it is fully dissolved in the water. 
  • Set the sugar syrup aside to let it cool over night.

On the seventh day:


Strain the lemons peels from the alcohol and discard the peels.


    Pour the sugar syrup into the glass jar with the alcohol and stir well.


    Serve chilled, from the refrigerator or freezer.


    NOTE: This Limoncello will keep for one to two years. Store the Limoncello in bottles with a cap or cork in your bar or cellar. When you want to drink it, chill the Limoncello in the refrigerator or freezer before serving. 


    ENJOY FOR YOURSELF OR TO GIVE AS A GIFT!


    Congratulations!  The winner of the giveaway is:
     Savoring Time in the Kitchen.  


    The winner was selected at Random and although it  shows 41 comments I posted 3 replies so there were actually only 38 comments.

    Thank you for all your comments.  Mamma Agata's book "Simple and Genuine" is a beautiful book that I recommend to purchase for yourself or a gift.

    Happy Cooking!

    Sunday, 29 April 2012

    Video - How to Make a Rose Swirl!

    On my last post I showed you how to create a Cupcake Bouquet for Mother's Day or any occasion.  I also mentioned I would demonstrate in an upcoming video, how to make a beautiful rose swirl for the top of  your cupcakes.

    Below is the video I put together just before taking these cookies to an event for Share Our Strength, an organization to help end childhood hunger.  I hope you will be able to tell from this video how they're done and be able to recreate your own roses at home. 


    Enjoy!

    Sunday, 18 December 2011

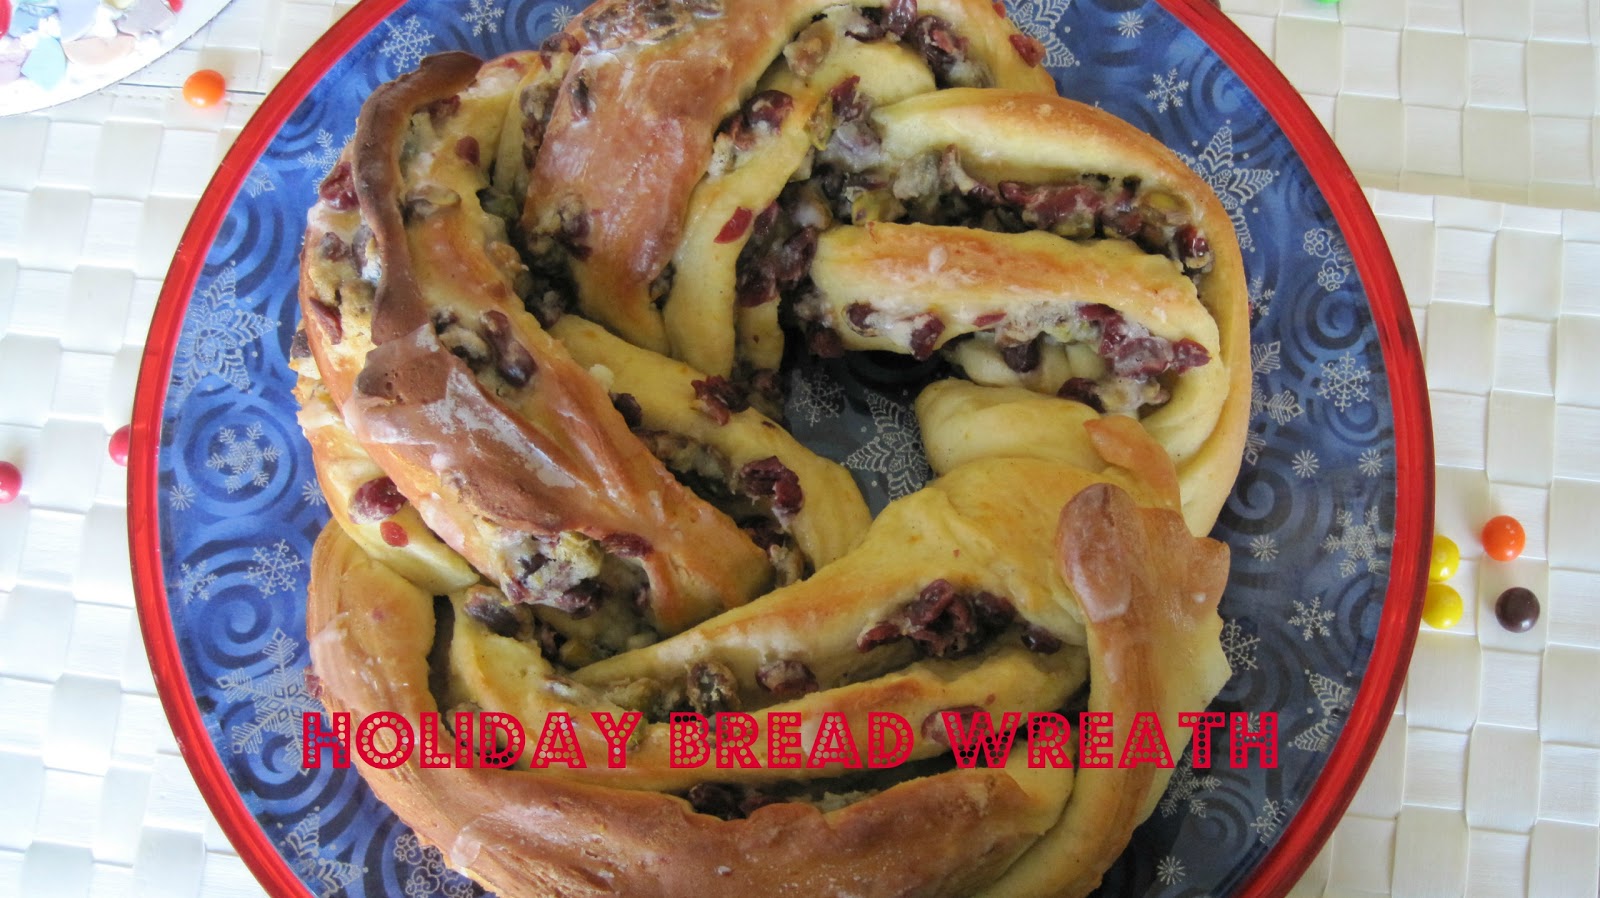
    Holiday Bread Wreath!


    I enjoy creating new dishes especially when the holidays come around.  The old tried and true are wonderful but every so often you need to break out of your comfort zone and try something different. 

    When I saw this post on Sara Kate's blog I knew I had to try some version of this Holiday Bread Wreath.  I've never been much of a bread baker and as I'm getting older I find I shy away from eating bread altogether because of the carbs and calories.  All that flew out the window when I laid my eyes on this spectacular loaf of swirling bread.

    Much to my surprise it wasn't difficult at all.  In fact it was easy and turned out tasting delicious!  My husband thought it was pretty but didn't want to indulge so I decided to share it with my mom and sister.  When I unveiled my creation they were all oohs and ahhs, just what I'd hoped.  We all dug in, had a slice and loved it.  The rest was left for my mom to share with her friends who would be stopping by later.

    This beautiful Holiday Bread Wreath would be a lovely gift to give someone or perfect served on Christmas morning.  Warm and cozy with some coffee, tea or hot cocoa.

    The recipe below comes from the December 1978 issue of Sunset Magazine.  However, Sara Kate Gillingham-Ryan made some changes to it and I made some changes to her recipe. 


    Below is my step by step version and this is Sara Kate's of The Kitchn:

    Holiday Bread Wreath with Cranberry-Pistachio Filling
    adapted from Sunset Magazine, December 1978
    makes about 12 servings

    1 packet (1/4oz) active dry yeast (2 1/4 teaspoons)
    1/4 cup warm water (about 110° F)
    1/2 cup warm milk (about 110° F)
    3 tablespoons sugar
    1/4 cup butter, softened to room temperature
    1 1/2 teaspoons salt
    1 teaspoon cardamom powder
    2 large eggs
    2 teaspoons orange zest
    3 1/2 cups unbleached all-purpose flour

    For the Cranberry-Pistachio Filling:

    3/4 cup dried cranberries or cherries, soaked in 1/2 cup Calvados (I used) or other liqueur
    6 tablespoons butter, softened to room temperature
    1/3 cup unbleached all-purpose flour
    3/4 cup shelled pistachios
    3 tablespoons sugar
    1 teaspoon orange zest
    1 teaspoon orange extract

    For the Sugar Glaze:

    1 cup powdered sugar
    2 tablespoons water
    1 tablespoon fresh squeezed orange juice
    1/4 teaspoon cardamom powder

    Instructions:

    In a large mixing bowl, dissolve the yeast in the water and let it foam up for a minute or two. (looks like fireworks going off in the water)

    Blend in the milk, sugar, butter, salt, cardamom, eggs and orange zest.

    Stir in two cups of the flour, one cup at a time. Beat for 2 minutes. (I used my stand mixer) Add remaining flour 1/2 cup at a time until you have a soft, workable dough. (dough will pull away from the sides of the bowl)

    Note: You might not use all the flour.

    Dump the dough out onto a lightly floured board and knead until smooth, shiny and elastic, about 5 to 10 minutes, adding more flour if needed to prevent sticking. (You know it's ready when dough becomes smooth, shiny and if you poke the dough it springs back)


    Place in a lightly oiled mixing bowl (I spray with non-stick spray) large enough to accommodate dough when doubled in size. Cover with plastic wrap and let it rise in a warm place until doubled (about 1 1/2 hours).

    Meanwhile, prepare the Cranberry-Pistachio Filling:


    Drain the dried fruit of its liqueur and reserve for another use. In a small bowl, combine the drained fruit with remaining filling ingredients. Cover and refrigerate.


    When dough has risen and doubled in size, punch it down and turn it out onto a lightly floured board, kneading just enough to release any air bubbles.


    Roll the dough into a 9- by 30-inch rectangle.


    Crumble the filling over the dough to within 1 inch of the edges. (forgot to take photo but can view Sara Kate's photos for reference) Starting along a long side, tightly roll up the dough, pinching edge against loaf to seal.


    With a sharp knife, cut roll in half lengthwise, carefully turn cut sides up,


    and loosely twist ropes around each other, keeping cut sides up. (An extra set of hands would have been nice here)


    Carefully transfer the wreath to a greased and floured baking sheet (I used Pam Baking Spray) and shape into a wreath, pinching ends together to seal.


    Let it rise, uncovered, in a warm place until puffy, about 45 minutes.

    Preheat oven to 350° F. Bake wreath until lightly browned, about 25 minutes.

    While wreath is baking, Prepare Sugar Glaze by stirring together ingredients until smooth.


    When wreath is done, transfer to a cooling rack with wide spatulas or a pizza peel.


    Cool for a few minutes then drizzle the glaze over the warm wreath. Serve sliced with extra butter if you're feeling decadent.

    The wreath can be prepared up to 2 days ahead of time, cooled completely and wrapped tightly in foil.

    Store at room temperature then re-heat at 350° for 10-15 minutes, drizzling the glaze just before serving.


    Note: Next time I'm planning to make this using chocolate chips, coconut, and macadamia nuts.  In place of the milk I'll use coconut milk and vanilla or coconut extract.

    This bread can be adapted to use any type of dried fruit and ingredients you like.  I think even adding cream cheese to the filling would be sensational.  Be creative and don't be afraid to experiment.   Afterall, that's the fun part of cooking!

    Enjoy!