Pages

Showing posts with label breads. Show all posts

Sunday, 5 May 2013

Dutch Oven Baked Artisan Bread!


If you've ever been to Italy I'm sure you'll remember the delicious bread brought to your table at lunch and dinner.  Dark, crunchy, crisp crust, light airy dough inside, too difficult to slice with a knife, but perfect for tearing and dipping into rich green extra-virgin olive oil. There's something rustic yet magical about the moment, that can only be experienced in Italy - until NOW! Now YOU can bake this bread, and have it hot from your oven, at home.

Unlike many breads, artisan bread making takes time, and specific techniques: fermentation, pre-ferments, autolysing (resting), proofing, punching down and folding.  Accurate measurements, time, and temperature are crucial.  These small batches of handcrafted breads with a thick and hearty crust, can be made with white or whole wheat flour, generally consisting of yeast, sugar, salt, corn oil, milk or water, requiring the dough to rise twice before baking. 

The recipe below from Matt Carlson of Big Sky Bread and Pastry with its short list of ingredients - flour, water, yeast and salt, is best measured with a food scale for accuracy, then baked in a Dutch Oven.  After reading about this recipe in an article posted by Sydne George, I was instantly intrigued and knew I had to try it.

My family avoids overloading on carbs these days, but this recipe was hard to resist.  After reading over the detailed instructions 4 times, adding my own side notes, I was ready to tackle it.  

I was nervous that it wouldn't turn out perfect, it wouldn't proof long enough or end up underdone or dry - I'm not a bread baker!  Instead, the recipe, truly easy to follow, was perfection - dark, crispy crust, with soft fluffy interior.  Oh, and my family gobbled it up for dinner! 

You must try this Dutch Oven Baked Artisan Bread!


BASIC WHITE FRENCH BREAD
Recipe by Matt Carlson

You will need a food scale for this recipe, as measurements are listed in grams. (I've added U.S.measurements if you don't have a scale but for best results a scale is recommended).
863 grams King Arthur all-purpose flour (3 3/4 cups)
634 grams water (at 80 degrees Fahrenheit) (2 3/4 cups)
3 grams instant yeast (1 tsp.)
17 grams salt (1 Tbsp.)
Preheat your oven and Dutch oven at 450 degrees 45-60 minutes before baking.
1. Mix flour and water until combined. Let rest for 30 minutes. This is called an autolyse (resting).
2. Add yeast and 2 tablespoons water (although it didn't state this I used 110F degree water, perfect for activating yeast) and using a wet hand begin to work it in by hand. Then add salt, and continue folding and pinching the dough between your thumb and index finger, until dough comes back together, about 5-10 minutes. Dough should be nice and smooth.. (Remember to keep a pitcher of water handy to wet hands so they don’t stick to dough.) 
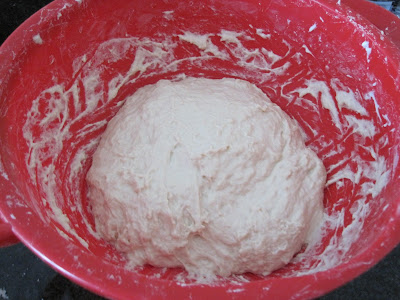


Dough left to rise for 5 hours


Dough after 5 hours

3. At this point, we’re giving dough what's called a "bulk rise". This will take four to five hours. Fold dough every 15 minutes during the first hour. This will develop strength. Dough will puff up and be double the size when it's ready.

4. Divide dough in half (750 grams each). Then round them into balls placing them seam-side down in two bread-proofing baskets or two bowls with towels in them. (If using the latter, be sure to dust towels with a decent amount of flour so dough doesn't stick..  Cover baskets with plastic wrap). Leave bread to proof for 1½ to 2 hours. It will hold an indentation but also spring back about halfway after being poked. 
Note: I started this at 10:00am and had to leave for the evening at 4:30pm.  I allowed loaves to proof for two hours then prior to leaving, placed both bowls, covered, in refrigerator until morning.  Removed from refrigerator at dawn, giving 1 1/2 hours to proof again, and come to room temperature before placing in oven..
5. Now that your Dutch Oven has preheated for 45 - 60 minutes at 450F degrees, remove it from the oven -  you're ready to bake!  Set pot on top of a hot pad, remove lid and set aside. Sprinkle inside bottom of Dutch oven with a dusting of flour. Working quickly, lightly dump your dough onto a floured counter. Seams should be up - you should see a cracked looking surface. (DO NOT flip dough over - you want cracks.) Using both hands, pick dough up gently, placing inside Dutch oven - remember it's hot!  Place lid back on, and return to oven.


Bake for 25 minutes. Remove lid and bake for another 15-20 minutes until bread is dark brown and beautiful.


Enjoy!!!


Friday, 21 December 2012

Pistachio-Parmesan Cheese Straws!


If you're anything like me, when you have a big celebration meal you like to serve bread at the table, but oftentimes it's just too filling.  

So instead, what I like to do is make cheese straws. They're light and tasty, not  filling, but satisfy that bread urge.  Best of all they're simple to make.

This is how I prepare them, but feel free to change the recipe to suit your taste.  These can be prepared ahead of time and sealed up in a zip lock baggy until ready to serve. 

Place cheese straws in a glass jar or vase on the dining room table for all to indulge.


Parmesan-Pistachio Cheese Straws


Ingredients:

1 ½ cups grated Parmesan cheese
½ cup chopped toasted pistachios
1 tbsp. freshly ground pepper
1 tsp. cayenne pepper
2 tsp. coarse sea salt
1 package frozen puff pastry dough, thawed
1 large egg, lightly beaten

Directions:

Stir the Parmesan cheese, pistachios, black pepper, and cayenne pepper in a mixing bowl to blend.

Line 2 baking sheets with parchment paper. 


On a lightly floured work surface, roll out each sheet of puff pastry dough until 1/8-inch thick.  Brush dough with some egg and sprinkle evenly with Pistachio-Parmesan mixture.   Then sprinkle sea salt over the entire surface.

Cut dough into 1/8-inch wide strips using a pizza wheel, and transfer strips to  prepared baking sheets, spacing 1-inch apart.

Working with 1 strip at a time, twist each strip to form a spiral. (I forgot to shoot that photo with so many standing and talking to me in the kitchen. Hope this photo below gives you the idea.)


Freeze or refrigerate strips until they are very cold. 

Meanwhile, preheat oven to 450F degrees.

Bake cheese straws, rotating halfway through until they are golden brown, 10 to 12 minutes.

So simple and delicious.  Serve in place of bread or even as an appetizer.  

Perfect for the holidays!


Enjoy!!!

Sunday, 11 November 2012

Cranberry Orange Pistachio Biscotti


With the holidays quickly approaching, all I feel like doing is baking - cakes, cookies, pies, and biscotti.  I love biscotti and never feel stuffed after eating one or two.  I love them with my coffee, tea or even as a midday snack.  They're so light and delicious!

A favorite recipe I've been making for years is Cranberry Pistachio Biscotti.  After viewing a biscotti recipe on one of the many blogs I frequent, I decided this morning when I woke up that I was going to make mine -  however, I thought I'd change it up a bit.  

I had some delicious Blood Orange Olive Oil that I purchased from a store that recently opened  at Plaza Frontenac in St. Louis, called DiOlivas.  I love Olive Oil and Vinegar stores as you're probably aware, if you've been following my blog for a while.  With a myriad of choices, each one delicious and unique in their own way (I was able to sample whatever I wanted), I walked out with quite a few varieties to take home and create, culinary masterpieces!

DiOlivas is a locally owned family business, so if you live in or around the St. Louis, Missouri area you should definitely pay them a visit.  If not, you can always purchase their products online - everything I tasted was so good, you can't go wrong with any of them.

So, this morning I decided to make biscotti.   Instead of my usual recipe that I often make during the holidays, I decided to use my Blood Orange Olive Oil instead of plain Olive Oil, plus, add the zest of an orange.  

OMG!  You have no idea how moist and delicious these were!  Even my daughter said they were the best biscotti I've ever made.  

So of course I knew I had to share the recipe with you.  I know you're going to love them.  Besides making them for yourself, don't forget to package some up to give as a holiday gift.  Who wouldn't love these?


Cranberry Orange Pistachio Biscotti
Makes approximately 28-30

¼ cup DiOlivas Blood Orange Olive Oil
¾ cup sugar
2 teaspoons Pure Vanilla
½ teaspoon almond extract
2 large eggs
½ teaspoon salt
1 ¾ cups, unbleached flour
1 teaspoon baking powder
½ cup dried cranberries
1 ½ cups pistachio nuts, shelled
Zest of one Orange

Preheat oven to 300F degrees.  Spray cookie sheet with non-stick spray and line with parchment paper.

Using an electric mixer, blend olive oil and sugar together. 
Then add vanilla and almond extracts and eggs, beating until the mixture is completely blended.

In a small bowl, whisk together flour, salt and baking powder until thoroughly combined.  On low speed, gradually add to the egg mixture.  Fold in orange zest, pistachios and dried cranberries.

Divide dough in half.  On the cookie sheet, form each half into a log about 12 inches long and 2 inches wide.  Space logs about 4 inches apart.  (Dough will be sticky so lightly moisten hands in cold water before forming into logs).

Bake in center of oven for 35 minutes or until the logs are light brown.  Remove from oven and turn heat down to 275F degrees.  Let logs cool on baking sheet 10 minutes.

With a large metal spatula, remove the logs to cutting board and using a long, sharp knife, cut each log on the diagonal into ¾ -inch slices. 

Stand slices upright on cookie sheet and return to oven for 8-10 minutes, until they are light brown.


Cool biscotti on rack and store in a tin between sheets of waxed paper.  They can be kept at room temperature for up to 2 weeks.

Enjoy!!!


Wednesday, 10 October 2012

Giveaway & Cranberry Orange Bread!


Have you ever noticed that once fall is in the air your eating habits change?  Instead, you find yourself gravitating towards hot soups, breads, oven cooked savory dishes and baked desserts.  Well, maybe not all of you, but definitely "yours truly."

I had been planning to bake some Cranberry Orange Bread when I received an email about a new tool on the market that I knew I needed to try.

Do you like zesters?  I love them and use them all the time especially when zesting oranges, lemons and limes.  This particular tool called the "Better Zester" by Edgeware, is amazing! I love this zester and believe me I've tried them all.


I love that it zests without getting the pith - this is because of the v-etched teeth


that just skim across the surface of the citrus.  Plus, it has a measuring compartment so you don't have to fuss with shoving it into a measuring spoon only to get 1/2 of the zest stuck to your fingers.  Even better, when I went to clean it, I didn't have to worry about shaving my fingers, which I found incredible. No Band-Aids needed!


The Better Zester can be found at Williams-Sonoma and online, and retails for $14.95.  However, I have an extra one to GIVEAWAY to one very lucky person.  All you have to do is post a comment telling me why you'd love to win the Better Zester, and:

  • Like Edgeware on Facebook
  • Follow Edgeware on Twitter
  • Like "At Home with Vicki Bensinger" on Facebook
Be sure for each "like" and "follow" to come back here and post a comment that you've done so.  This will increase your chances of winning.

I'm sorry but this offer is only available in the United States.  The winner will be selected at Random on Monday, October 15th around Noon central standard time.  

Be sure to leave a link to your contact information in the event you are the winner.  The winner needs to respond within 48 hours of notification or another winner will be selected.    Good luck!

The winner of the Better Zester from Edgeware was selected at Random on Monday, October 15, 2012 at Noon central time.  Of 48 comments number 33 - SusiTravl was selected.  Congratulations Susi.  Please contact me within 48 hours to claim your gift.


As I mentioned earlier I made a Cranberry Orange Bread using my Better Zester.  This bread is delicious with coffee or tea in the morning, or even a mid-day snack.  Better yet, bake some to wrap up to give as gifts, and attach a Better Zester with it.  Who wouldn't love that!

For the Cranberry Orange Bread recipe read below.........

Cranberry Orange Bread
yields 1 loaf

2 cups flour
1 1/2 teaspoons baking powder
pinch of salt
2 tablespoons, unsalted butter, melted
1/4 cup Grand Marnier
1 egg, well beaten
2 cups fresh cranberries, coarsely chopped
1 cup sugar
1/2 teaspoon baking soda
juice and zest from 1 orange
water
powdered sugar

Preheat oven to 350F degrees.  Sift flour, sugar, baking powder, baking soda and salt together.  In a separate measuring cup, combine the orange juice, zest, butter, Grand Marnier and enough water to make 3/4 cup liquid.  Stir in egg.  Mix liquids into dry ingredients until just blended.

Spray an 8x4 inch loaf pan with non-stick spray.  Pour batter in pan and bake in preheated 350F degree oven 50-60 minutes or until toothpick inserted comes out clean.  Allow to cool 10 minutes in pan.  Remove from pan and sprinkle with powdered sugar if desired.  Serve.


ENJOY!!!


Sunday, 3 June 2012

Virtually No Fat Banana Bread


May was such a crazy month, I feel like I've barely had time to post anything.  My daughter graduated from college up in Boston.  All of us attended and spent a wonderful weekend together as a family.  Then back to St. Louis, just in time to have carpet replaced in our home.  It was exhausting work especially since I had to clean out some of the closets, mine in particular, which was stacked with cookbooks, and culinary magazines.  I hate throwing those away but many were pitched. 

My new resolution is to order those that I read frequently online and delivered to my inbox, where I can view the magazine on my PC or iPad.  It's a great way to eliminate stacks of magazines.  Instead places like Zinio store them by date and even provide a yearly index.  I hopeful that this will resolve my hoarding of culinary magazines.

My last post was a week ago Friday where I created a Feijoas Curd Trifle using homemade Virtually No Fat Banana Bread, a recipe I created many years ago.  I mentioned there, that I'd share the recipe in my next post.  I usually call this fat free banana bread but actually bananas have approximately 1 gram of fat along with a host of health benefits and eggs have some fat too.  So I decided a better name would be Virtually No Fat Banana Bread.  Wouldn't you agree?

You may remember that my family insists on fat free everything even though I tell them it's not always the best option.  With that in mind I modified my old favorite banana bread recipe to be figure friendly - it's so moist and delicious!  Honestly, no one would ever know it's virtually fat free.  Although there's sugar in it, I've reduced the amount initially used, by half.   I'm sure you could substitute agave nectar (using 1/2 the amount of the sugar) or honey, although I've never tried it with this particular recipe.

Once you make my Banana Bread, I know it will become one of your favorites.


Virtually No Fat Banana Bread
makes 1 loaf

Ingredients:

1/2 cup applesauce (I used Musselmans Natural Unsweetened)
3/4 cup sugar
2 eggs, well beaten
1/4 teaspoon salt
1 1/2 cups sifted flour
1 teaspoon baking soda
1 (6oz) container fat free Vanilla yogurt (I used Dannon)
3 very ripe bananas, mashed (the skins on mine were black - best flavor when very ripe)

Cream applesauce and sugar; add eggs and salt and mix well. Add flour, soda and yogurt and mix well. Add bananas blending well into the mixture.

Note: At this time if you wanted to add any chocolate chips or nuts you can blending well.

Grease or spray with non-stick cooking spray one regular size loaf pan; pour mixture into pan and bake in a preheated 350F degree oven for approximately 45 minutes to 1 hour. When the bread pulls away from the sides of the pan and toothpick comes out clean, the bread is done.  If top of bread starts getting too brown place foil over top. 

This recipe can be doubled.

If you want to use plain yogurt or some other flavor then feel free to do so. The best part about cooking yourself is that you can modify a recipe anyway you like.
Enjoy!


Sunday, 18 December 2011

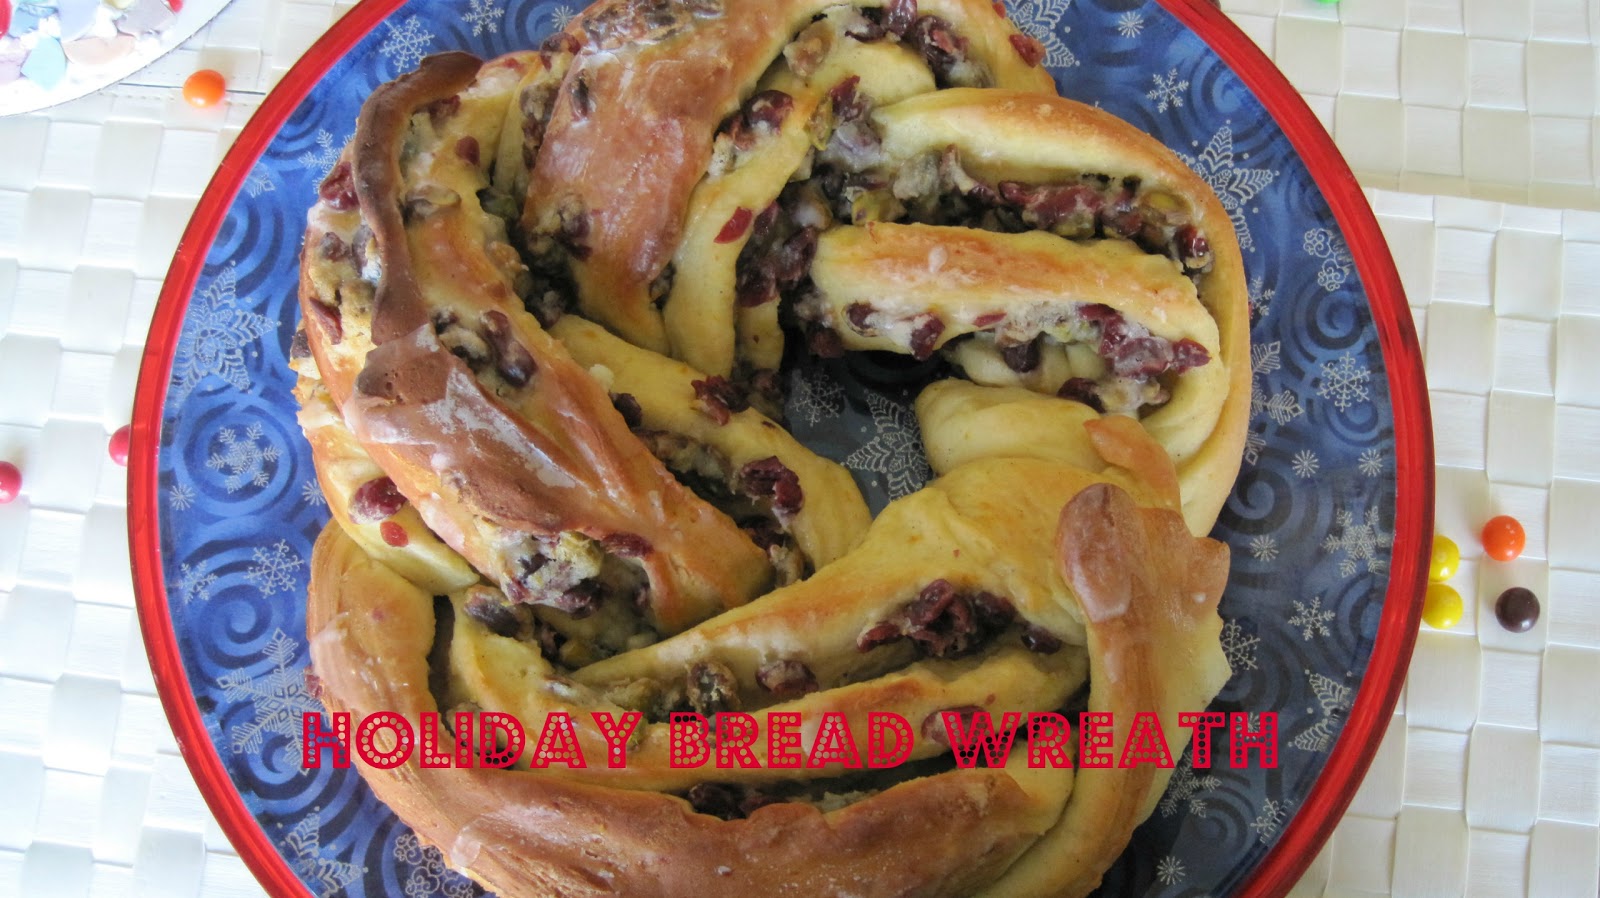
Holiday Bread Wreath!


I enjoy creating new dishes especially when the holidays come around.  The old tried and true are wonderful but every so often you need to break out of your comfort zone and try something different. 

When I saw this post on Sara Kate's blog I knew I had to try some version of this Holiday Bread Wreath.  I've never been much of a bread baker and as I'm getting older I find I shy away from eating bread altogether because of the carbs and calories.  All that flew out the window when I laid my eyes on this spectacular loaf of swirling bread.

Much to my surprise it wasn't difficult at all.  In fact it was easy and turned out tasting delicious!  My husband thought it was pretty but didn't want to indulge so I decided to share it with my mom and sister.  When I unveiled my creation they were all oohs and ahhs, just what I'd hoped.  We all dug in, had a slice and loved it.  The rest was left for my mom to share with her friends who would be stopping by later.

This beautiful Holiday Bread Wreath would be a lovely gift to give someone or perfect served on Christmas morning.  Warm and cozy with some coffee, tea or hot cocoa.

The recipe below comes from the December 1978 issue of Sunset Magazine.  However, Sara Kate Gillingham-Ryan made some changes to it and I made some changes to her recipe. 


Below is my step by step version and this is Sara Kate's of The Kitchn:

Holiday Bread Wreath with Cranberry-Pistachio Filling
adapted from Sunset Magazine, December 1978
makes about 12 servings

1 packet (1/4oz) active dry yeast (2 1/4 teaspoons)
1/4 cup warm water (about 110° F)
1/2 cup warm milk (about 110° F)
3 tablespoons sugar
1/4 cup butter, softened to room temperature
1 1/2 teaspoons salt
1 teaspoon cardamom powder
2 large eggs
2 teaspoons orange zest
3 1/2 cups unbleached all-purpose flour

For the Cranberry-Pistachio Filling:

3/4 cup dried cranberries or cherries, soaked in 1/2 cup Calvados (I used) or other liqueur
6 tablespoons butter, softened to room temperature
1/3 cup unbleached all-purpose flour
3/4 cup shelled pistachios
3 tablespoons sugar
1 teaspoon orange zest
1 teaspoon orange extract

For the Sugar Glaze:

1 cup powdered sugar
2 tablespoons water
1 tablespoon fresh squeezed orange juice
1/4 teaspoon cardamom powder

Instructions:

In a large mixing bowl, dissolve the yeast in the water and let it foam up for a minute or two. (looks like fireworks going off in the water)

Blend in the milk, sugar, butter, salt, cardamom, eggs and orange zest.

Stir in two cups of the flour, one cup at a time. Beat for 2 minutes. (I used my stand mixer) Add remaining flour 1/2 cup at a time until you have a soft, workable dough. (dough will pull away from the sides of the bowl)

Note: You might not use all the flour.

Dump the dough out onto a lightly floured board and knead until smooth, shiny and elastic, about 5 to 10 minutes, adding more flour if needed to prevent sticking. (You know it's ready when dough becomes smooth, shiny and if you poke the dough it springs back)


Place in a lightly oiled mixing bowl (I spray with non-stick spray) large enough to accommodate dough when doubled in size. Cover with plastic wrap and let it rise in a warm place until doubled (about 1 1/2 hours).

Meanwhile, prepare the Cranberry-Pistachio Filling:


Drain the dried fruit of its liqueur and reserve for another use. In a small bowl, combine the drained fruit with remaining filling ingredients. Cover and refrigerate.


When dough has risen and doubled in size, punch it down and turn it out onto a lightly floured board, kneading just enough to release any air bubbles.


Roll the dough into a 9- by 30-inch rectangle.


Crumble the filling over the dough to within 1 inch of the edges. (forgot to take photo but can view Sara Kate's photos for reference) Starting along a long side, tightly roll up the dough, pinching edge against loaf to seal.


With a sharp knife, cut roll in half lengthwise, carefully turn cut sides up,


and loosely twist ropes around each other, keeping cut sides up. (An extra set of hands would have been nice here)


Carefully transfer the wreath to a greased and floured baking sheet (I used Pam Baking Spray) and shape into a wreath, pinching ends together to seal.


Let it rise, uncovered, in a warm place until puffy, about 45 minutes.

Preheat oven to 350° F. Bake wreath until lightly browned, about 25 minutes.

While wreath is baking, Prepare Sugar Glaze by stirring together ingredients until smooth.


When wreath is done, transfer to a cooling rack with wide spatulas or a pizza peel.


Cool for a few minutes then drizzle the glaze over the warm wreath. Serve sliced with extra butter if you're feeling decadent.

The wreath can be prepared up to 2 days ahead of time, cooled completely and wrapped tightly in foil.

Store at room temperature then re-heat at 350° for 10-15 minutes, drizzling the glaze just before serving.


Note: Next time I'm planning to make this using chocolate chips, coconut, and macadamia nuts.  In place of the milk I'll use coconut milk and vanilla or coconut extract.

This bread can be adapted to use any type of dried fruit and ingredients you like.  I think even adding cream cheese to the filling would be sensational.  Be creative and don't be afraid to experiment.   Afterall, that's the fun part of cooking!

Enjoy!

Tuesday, 15 November 2011

How to make Popovers?


For years I've been making popovers to go with our Thanksgiving dinner.  In my opinion they're the perfect bread to go with a heavy meal.  They're light, airy and delicious.

My first encounter with popovers was while dining at The Zodiac Room in Neiman Marcus.  I thought they were incredible and when I would take my children (now 22 & 25) with me, they loved them as well, especially slathered with their heavenly strawberry butter.

Over the years I've perfected making these airy little puffs, getting rave reviews from all who try them.  I get so many requests for this recipe I posted a video last year on my blog for the Thanksgiving holidays and decided I would post it again.

I hope you enjoy my video.  I've posted the full recipe below.  I know you'll love them, just as my family does.


Here's the written recipe for you to follow:

Perfect Popovers
Makes 12 small or 6 large

Ingredients:

3 eggs, room temperature
1 cup milk, room temperature (I use skim)
3 Tbsp. Canola Oil
1 cup, all-purpose flour
1/2 tsp. kosher salt
Instructions for cooking in Convection mode and Bake mode:

Preheat oven to 400 degrees in either convection/bake mode or just bake.

While preparing the batter spray your popover pan with a non-stick cooking spray and place in the oven to heat up.

If eggs and milk are not at room temperature heat eggs (removed from their shell) for approximately 12 -15 seconds and milk for about 20-30 seconds in the microwave.

Whisk eggs, milk and oil together. Sift flour and add to the egg mixture. Add the salt and beat mixture together until it's smooth and free of any clumps.

Take popover pan out of the oven and place a small bit of butter into each popover cup (as shown in the video).

Pour batter 3/4 way full into each popover cup. If you run short and one of the cups is empty add water filling up about 1/2 way.

Place filled pan into the 400 degree oven and bake for:

Convection/Bake 20 minutes

Bake: 30 minutes

           (After 20-30 minutes of cooking)

Then, leaving the oven door closed, reduce heat to 325 degrees.

At this time if you were cooking in the convection mode switch to BAKE. Cook for an additional 5-15 minutes keeping a close eye on the popovers.

You'll know that they are done when they turn a nice golden brown, as seen in my video and at the top of this page.

Note: You can use a muffin pan if you like, but the popover pan produces a much prettier popover.

Popovers are best when baked just before serving. Serve hot with butter, strawberry butter, pumpkin butter, plain or with whatever you desire.

As always, if you have any questions while preparing these, don't hesitate to contact me. I'm always happy to help.

Enjoy!

Tuesday, 31 May 2011

Cheddar Scallion Cornbread Madeleine's


Last night, although it was just my husband and I celebrating Memorial Day, I decided I'd make a fun meal.  So I made some incredibly delicious Asian BBQ Kobe Beef Ribs which I'll be posting in my newsletter next week, Asian Rainbow Slaw, BBQ Baked Beans and Cheddar Scallion Cornbread Madeleine's. To finish off our dinner we had some refreshing iced cold watermelon.

I know it sounds like a lot for just the two of us, but we like leftovers, and I'm sure my son will be popping over in the next day or so and open the refrigerator to see what might be in there that he can nibble on.  Not too much goes to waste in my house.

The meal was superb and while neither of us over indulged we licked our platters clean. 

I especially loved the Cornbread that I put in my Madeleine Pan.  It made for a perfect serving and of course if you wanted more there was plenty to go back to.

Although you can make these in a regular 9x13" pan why not go for the WOW factor and make them in something different?  If you like cornbread you'll love these, and with BBQ season here, they're perfect for large gatherings and easy to pick up.

If you try these please let me know what you think.

Cheddar Scallion Cornbread Madeleine's
Makes about 36 Madeleines or 18 squares


Ingredients:

Nonstick cooking spray or unsalted butter for preparing pan

2 cups all-purpose flour
1 cup yellow cornmeal
1 1/2 teaspoons baking powder
1 teaspoon baking soda
1/2 teaspoon kosher salt
Pinch of freshly ground pepper

2 large eggs
1/2 cup sugar
1/2 cup (1 stick) unsalted butter, melted and cooled
3/4 cup sour cream
1/2 cup whole milk

2 cups shredded sharp white Cheddar cheese
1 cup thinly sliced scallions, white and tender green parts

Directions:

Preheat the oven to 350 degree F. Spray 36 madeleine molds or one 9-by-13-by-2-inch baking pan with nonstick cooking spray, or grease with butter.

In a large bowl, stir together the flour, cornmeal, baking powder, baking soda, salt and white pepper. In a medium bowl, whisk together the eggs and sugar until thickened and smooth. Add the melted butter and whisk until incorporated. Then add the sour cream and milk and whisk until smooth.

Add the egg mixture to the flour mixture and stir until just until combined. Add the cheese and scallions and mix gently just until evenly incorporated. Do not overmix. Using a spoon, fill each prepared madeleine mold half full with batter. Or, pour the batter into the prepared baking pan.

Bake for 12 to 15 minutes, or until the corn bread is golden. Let cool in the madeleine pans or baking pan on a wire rack. Invert the pan onto the rack, or if using a rectangular pan cut into squares and remove from the pan. Serve warm or at room temperature.

Note: This recipe can easily be divided in half.

Enjoy!

Tuesday, 21 December 2010

Easy Overnight Caramel Pecan Rolls for Christmas Morning


So you're having your entire family in town for the holidays and their staying at your house. You have a long list of groceries to purchase, food to prepare and you're already exhausted.

Plus, Christmas morning you're serving a HUGE breakfast for everyone. Wouldn't it be nice to do as much of the prepping ahead that you can?

Caramel Pecan rolls seem to be a Christmas morning tradition for so many families. Instead of slaving over making those caramel rolls to go with your egg casserole or fritatta, why not try these Easy Overnight Caramel Pecan Rolls. Not only are they a cinch to prepare but they taste as good as the ones we spend hours rolling out and making from scratch and as good if not better than the ones you might order.

I've been making this recipe for years and it never fails, everyone gobbles them up. So whether you're making them for Christmas morning, a luncheon, or dinner they're sure to be a hit.

I know the ingredients may sound a bit strange but trust me, these are worth trying.

Easy Overnight Caramel Pecan Rolls

1/2 cup chopped pecans

20 frozen, unbaked bread rolls (do not thaw)


1 package (3 1/2 oz.) dry butterscotch pudding (not instant)

1/2 cup unsalted butter

3/4 cup light brown sugar

1 teaspoon cinnamon

Butter a 12-inch Bundt pan. Sprinkle bottom of pan evenly with chopped pecans.

Place bread rolls in pan, touching and filling the bottom first, then layering on top.

Sprinkle dry pudding evenly over top of rolls. Set aside.


In a small saucepan, melt butter over low heat, then stir in the brown sugar and cinnamon and continue cooking, stirring constantly, until sugar is dissolved. Pour butter mixture evenly over bread rolls and pudding mixture.

Leave uncovered and place in a cool oven or on your kitchen counter overnight. (The rolls will rise over the top of the pan.)


When you wake up that next morning, bake the rolls in a 350 degree oven for 25 to 35 minutes. Place a foil lined cookie sheet under the bundt pan to catch any drippings while baking.

Once cooked, remove bundt pan from oven and let cool slightly in the pan.

When ready to serve, place a serving plate over the top of the Bundt pan. Holding the plate and pan together, flip them over so the plate is on the bottom and take off the Bundt pan.

The rolls hold together and are topped with a delicious caramel sauce with pecans. (See photo at the top of this page).

Pull the rolls apart with your hands as you serve them.

Note: Feel free to use walnuts instead of pecans if you prefer.

Enjoy!