Pages

Wednesday, 6 June 2012

Mango Sorbet over Pineapple Carpaccio with Raspberry Sauce


In April I was invited to join the 5 Star Makeover Challenge.  A group of bloggers that come up with culinary topics each month, for members to create dishes and share at the end of the month.  In April the topic given was Restaurant Wars.  Members were divided up into teams of 3 and each team was asked to create a theme or use a specific ingredient, plus name their restaurant. We had until June to present it.

Our team elected to do a menu of Raw Food and the name of our restaurant was "Eating In The Raw."  Unfortunately due to circumstances out of our control, we had to bow out of the event.  However, since I already put my dish together, I decided to share it with you today. You can view other team creations here.

We were to make an appetizer, entree' and dessert.  I was elected to make the dessert.

The raw food diet is based on the belief that the most healthful food for the body is uncooked. Although most food is eaten raw, heating food is acceptable as long as the temperature stays below 104 to 118 degrees Fahrenheit (the cutoff temperature varies among those in the raw food community).

Cooking is thought to denature the enzymes naturally present in food. According to raw foodists, enzymes are the life force of a food, helping us to digest food and absorb nutrients. If we over consume cooked food, our bodies are forced to work harder by producing more enzymes. Over time, a lack of enzymes from food is thought to lead to digestive problems, nutrient deficiency, accelerated aging, and weight gain.

I decided to make a Mango Sorbet and after a bit of research I came up with this dish.


Mango Sorbet over Pineapple Carpaccio with Raspberry Sauce
serves 4-6


Sorbet Ingredients:

4 Mangoes
juice of a lime (about 4 teaspoons)
zest of a lime
1/3 cup Agave Nectar
2/3 cup Pure Coconut Water

Pineapple, sliced paper thin on a Mandoline

Raspberry Sauce Ingredients:

6 ounce container Raspberries, rinsed and drained
2 teaspoons Agave Nectar
1 1/2 teaspoons water

Directions for Mango Sorbet:

Peel the mangoes and cut the flesh away for the pit.(Facts about and directions for cutting a mango).


Cut the flesh into chunks and put them in a blender with the next 4 ingredients.  Puree the mixture until smooth.  Taste, and add more agave nectar or lime juice if desired. 


Chill the mixture for about 2 hours then place in ice cream machine and swirl according to manufacturers instructions. 


Can serve immediately or remove from ice cream machine and place in a plastic container with lid and place into the freezer until ready to serve.  Let set out for about 15 minutes to soften before serving.


Raspberry Sauce Directions:

Puree the raspberries, water, and agave nectar in a food processor until smooth.  Then, strain through a fine mesh strainer to remove the seeds.  Press the solids against the strainer to get as much of the sauce as possible.  Pour into a squirt bottle if you have one, this makes decorating the plate with the sauce easy.  The raspberry sauce can be made ahead and refrigerated for up to 2 days.

Pineapple Directions:

Cut off top and bottom of a fresh pineapple, then cut off the sides just leaving the flesh.  With a mandoline, starting at the top or bottom slice 1/8-1/4 inch slices.  (You may need to shape the sides of your pineapple to fit the top of the mandoline so the pineapple can slide easily). 

Plating this Dish:


Lie one slice of pineapple at one edge of the plate then slightly overlapping add 2 more slices.  Place the 4th slice on the opposite edge of the plate lying flat. 

Place a scoop of Mango Sorbet on the flat piece of pineapple.  Drizzle with Raspberry Sauce.  Serve.

Each component of this dish is delicious on it's own and can be served numerous ways, so let your creativity flow.  If you prefer not to use agave nectar where it's used in this recipe you could substitute honey or sugar (double the amount of sugar). 

Enjoy!


Sunday, 3 June 2012

Virtually No Fat Banana Bread


May was such a crazy month, I feel like I've barely had time to post anything.  My daughter graduated from college up in Boston.  All of us attended and spent a wonderful weekend together as a family.  Then back to St. Louis, just in time to have carpet replaced in our home.  It was exhausting work especially since I had to clean out some of the closets, mine in particular, which was stacked with cookbooks, and culinary magazines.  I hate throwing those away but many were pitched. 

My new resolution is to order those that I read frequently online and delivered to my inbox, where I can view the magazine on my PC or iPad.  It's a great way to eliminate stacks of magazines.  Instead places like Zinio store them by date and even provide a yearly index.  I hopeful that this will resolve my hoarding of culinary magazines.

My last post was a week ago Friday where I created a Feijoas Curd Trifle using homemade Virtually No Fat Banana Bread, a recipe I created many years ago.  I mentioned there, that I'd share the recipe in my next post.  I usually call this fat free banana bread but actually bananas have approximately 1 gram of fat along with a host of health benefits and eggs have some fat too.  So I decided a better name would be Virtually No Fat Banana Bread.  Wouldn't you agree?

You may remember that my family insists on fat free everything even though I tell them it's not always the best option.  With that in mind I modified my old favorite banana bread recipe to be figure friendly - it's so moist and delicious!  Honestly, no one would ever know it's virtually fat free.  Although there's sugar in it, I've reduced the amount initially used, by half.   I'm sure you could substitute agave nectar (using 1/2 the amount of the sugar) or honey, although I've never tried it with this particular recipe.

Once you make my Banana Bread, I know it will become one of your favorites.


Virtually No Fat Banana Bread
makes 1 loaf

Ingredients:

1/2 cup applesauce (I used Musselmans Natural Unsweetened)
3/4 cup sugar
2 eggs, well beaten
1/4 teaspoon salt
1 1/2 cups sifted flour
1 teaspoon baking soda
1 (6oz) container fat free Vanilla yogurt (I used Dannon)
3 very ripe bananas, mashed (the skins on mine were black - best flavor when very ripe)

Cream applesauce and sugar; add eggs and salt and mix well. Add flour, soda and yogurt and mix well. Add bananas blending well into the mixture.

Note: At this time if you wanted to add any chocolate chips or nuts you can blending well.

Grease or spray with non-stick cooking spray one regular size loaf pan; pour mixture into pan and bake in a preheated 350F degree oven for approximately 45 minutes to 1 hour. When the bread pulls away from the sides of the pan and toothpick comes out clean, the bread is done.  If top of bread starts getting too brown place foil over top. 

This recipe can be doubled.

If you want to use plain yogurt or some other flavor then feel free to do so. The best part about cooking yourself is that you can modify a recipe anyway you like.
Enjoy!


Friday, 25 May 2012

Feijoas Curd Trifle


When Melissa's sent me a basket of products 2 weeks ago, most were foreign to me.  Intrigued, I set out to sample and create recipes for each fruit and grain I tested.  Of all, the Cherimoya and Feijoas were the most challenging.

I'd never heard of a Feijoas before but they looked quite similar to limes, except when cut open.  The insides were firm like a cantaloupe with tiny brown, edible seeds.  To taste, they resembled a variety of delicious fruits but none that I could pinpoint. 


My first instinct was to make a Feijoas Curd.  After 2 weeks of debating with myself that was my final choice. 


Although the meat of the Feijoas is white, while making the curd it became a tan caramel-like color - not at all appealing.  My guess, the seeds caused the change in color.  I thought, "there's no way I can photograph this and report about it."  But, after tasting the finished product I realized I had to share it, color and all. 

I had no idea what to expect while cooking, especially since the interior of the Feijoas was firm, not liquid like most fruits I've turned into curd.  Once thickened, strained and refrigerated I had to decide how to plate it.  Alone was not an option, since the color wasn't exactly appetizing for a dessert.  So I decided to make my fat free banana bread and make individual trifles.


I know, why am I making a fat free banana bread with a butter-rich curd?  Because if my family didn't like the curd I knew they'd eat my fat free banana bread.

Hot from the oven, I let the banana bread cool down a bit so I could remove it from the pan and cut into chunks.  Using a cocktail glass I placed some curd in the bottom, topped with warm banana bread cubes, topped with more feijoas curd.  The end result was like a warm bread pudding that tasted so incredible, I literally had to force myself to stop eating it. 

My son had stopped by just in time to sample - he's my biggest critic, and he loved it!  Unfortunately my husband went to bed early so he wasn't able to try it, but I'm sure he'll agree when he samples it, that it's quite tasty.


I can't begin to explain what the Feijoas Curd tastes like or the Feijoas on its own.  Although very familiar, we just couldn't put our finger on it. We only knew it tasted tropical.

Although the curd came from the refrigerator, when placed with the hot banana bread cubes you couldn't distinguish cold from hot.  It was all just nice, warm and yummy.  I could have licked the cocktail glass clean. 

I hope you'll march down to your local grocer to get some Feijoas and try my Feijoas Curd with my Fat Free Banana Bread (that recipe will be posted next week).  I think you'll like it.

If you can't find Feijoas look here for a store near you or ask your local grocer to order some.

Below is the recipe for my Feijoas Curd.  Next week I'll post the recipe for my Fat Free Banana Bread.


Feijoas Curd

Makes 1 ½ cups


1 tablespoons Feijoas zest (zest of about 5 Feijoas)

2 large egg yolks, lightly beaten

3 large whole eggs, lightly beaten

1 stick unsalted butter (8 tablespoons)

¾ cup granulated sugar

meat from 5 Feijoas, cut in 1/2 and scooped out, including seeds


  • Whisk all ingredients together in a large heat proof bowl, mashing the Feijoas'
  • Place the bowl over a pan of simmering water and cook, stirring frequently until very thick, about 20 to 25 minutes
  • Strain, cover and chill completely.
Serve with my Fat Free Banana Bread in individual cocktail glasses. 

Place 2 tablespoons of Feijoas Curd in bottom of cocktail glass, top with cubes of warm banana bread then top with more Feijoas Curd ~ Enjoy!

If you missed the other delicious products I received from Melissa's please check my previous posts with recipes below:


I hope you enjoy all these recipes.  Have a Happy and Safe Memorial Day! 

Please REMEMBER those who have served to protect us!


Wednesday, 16 May 2012

Yummy Ojai Pixie Tangerines PLUS 2 Recipes!


I have always loved oranges.  In fact, if you've been following my posts for a while you'll remember how I ate them daily when coming home from school as a child.  I shared this in my post The Art of Eating an Orange.  So when Melissa's Produce sent me a bag of these adorable tiny seedless Ojai Pixie Tangerines I was so excited.  Their skins, are easy to peel like a tangerine, with each segment of these tiny morsels so sweet and juicy with a hint of mandarin in every bite. YUM!  Fortunately there was more than enough to enjoy eating them in the raw, while still having plenty to play with in recipes.

My first thought was to make Dreamsicles, a childhood favorite of mine, a blend of vanilla ice cream and orange sherbet. I loved those little push-ups?  Do you remember them? 

Since I had a large batch of plastic push-up containers this would be the perfect recipe to create, except for one thing.  I knew if  I made them full fat, like I had as a child, they would sit in my freezer.  Since we try desperately to watch our calories and fat intake these would have to be modified and waistline friendly. 

My low-cal Dreamsicle version recipe is posted below, an adaptation of Orange Popsicle Ice Cream from The Perfect Scoop by David Lebovitz.  If you are looking for the real deal I have David's version in blue print.

Don't forget to also check out the second recipe I posted, Sea Bass with Strawberry Tangerine Salsa, following the Orange Popsicle ice Cream Push-Ups below.


Orange Popsicle Ice Cream Push-Ups
(adapted from The Perfect Scoop by David Lebovitz)

Ingredients:
2 teaspoons agave nectar  ⅔cup sugar
Grated zest of 3 Ojai Pixie Tangerines (oranges)
1¼ cups freshly squeezed Ojai Pixie Tangerines (approx. 7 tangerines) orange juice (from 4 or 5 large oranges)
2 cups 0% Greek Yogurt  or 1 cup sour cream and ½ cup half-and-half
2 teaspoons Grand Marnier or another orange liqueur

Directions: (if doing the full fat version substitute with the red print)

In a blender or food processor, combine the agave and  tangerine zest; pulse the mixture until it's well blended and zest is pulverized. Add  tangerine juice, greek yogurt, and orange liqueur. Blend well until the mixture is smooth. Chill thoroughly in the refrigerator. Freeze in an ice cream maker (for about 10 minutes if placing in push-up containers) or according to the manufacturer's instructions if making regular scoop ice cream.


Spoon into pastry bag,


then twist the top and cut the tip, squeezing ice cream into push-up containers.


Place lids on top and place in freezer until frozen and ready to serve.
 
Note: If pouring in push-up containers it's easier, in my opinion, if you swirl ingredients in the ice cream maker to firm slightly before adding to push pops.  However, if you don't have an ice cream machine you can simply add directly to containers and freezer until firm.

Adding the liqueur is necessary.  This insures that the ice cream doesn't freeze solid. You can substitue vodka as well or whatever you prefer.


What I'd Change:  I found the zest of the Ojai Pixie Tangerine to be more bitter than that of a regular orange.  I was very careful when zesting however the skin is so thin that I think the bitter flavor comes right through.  When making the next time I will omit the zest.

Although I thought my low-cal version was delicious, it still doesn't compare to the full fat Dreamsicle version but hey it's a fraction of the calories!


Alternative:  If you don't have push-up containers pour ice cream into small paper cups; cover with foil, poking popsicle sticks through center of foil to keep upright and centered.  Freeze until firm. Peel off the paper cups before serving.) 

Yields: About 1 quart or 8 Push-Up Pops

Sea Bass with Strawberry Tangerine Salsa


In addition, one of my all time favorite recipes is my Sea Bass with Strawberry Orange Salsa.  Our local newspaper posted an article several years ago about "At Home with Vicki Bensinger" sharing this recipe.  Since I planned on making Sea Bass the other night, I decided to make this dish using some of my Ojai Pixie Tangerines in place of the traditional oranges. I liked the flavor they brought to this dish even better.

This recipe is perfect for your upcoming BBQ, Father's Day or Memorial Day celebration.  It's light quick to prepare and delicious.  I know you'll love it, especially using the Ojai Pixie Tangerines.  Remember to check here, in the lower left, for a store that carries them near you.  If they don't carry them, Melissa's says to ask the produce manager and they will get them for you.

Sea Bass with Strawberry Tangerine Salsa
Serves 6

Ingredients:

2 pounds Sea Bass fillets, cut into 6 pieces (with skin on if grilling)

Strawberry Orange Salsa

4 Ojai Pixie Tangerines, segmented and diced
1 cup fresh strawberries, stemmed and diced
1/2 - 1 jalepeno chili, stemmed, seeded and minced
1/2 cup thinly sliced green onions
1/4 cup chopped fresh mint or fresh basil leaves
2 Tbsp. lime juice
1-2 tsp. honey
salt


Peel the Ojai Pixie Tangerines  and remove all the white pith (it has a bitter taste). Section the tangerines and dice. Transfer the diced tangerines to a bowl with the strawberries, jalapenos, onions, mint (or basil) and lime juice. Add honey and salt to taste, then blend together. Cover and chill for at least an hour to let the flavors come together.

Grill Method:

Heat grill to medium heat and place Sea Bass, skin side down on the grates. (If the skin has been removed be sure to rub the fish with oil before placing on grates).  Cover and cook for approximately 20 minutes.  You'll know it's done when you place the tip of a knife or fork into the meat and it separates easily - the center will be opaque.

Poaching Method:

Rinse the fish in cold water. Measure the thickness of the fish and pour water into a deep skillet or saute pan to measure twice that thickness. Bring the water to a boil, add the sea bass, cover the pan and remove it from the heat. Let stand until the fish is opaque in the center approximately 20 minutes.

Lift the fish from the pan with a slotted spatula and drain, arrange on individual plates. Spoon the salsa with its juice over the fish and serve immediately.

For those of you that have a fear of cooking fish, this method is tried and true. It always comes out perfect.

I hope you will try both of my recipes using the Ojai Pixie Tangerines, but don't forget to try the in the raw as well.  They're simply delicious!

Enjoy!!!

Thursday, 10 May 2012

BMT Tower Salad


Back in March I posted a Roasted Beets and Butternut Squash Salad.  I mentioned then that I stopped eating beets for quite sometime but then recently rediscovered them roasted and fell in love.  In that post I roasted the beets myself which is fun but takes time and can be messy. 

Do you prefer to whip your meals up quickly without lacking that sensational taste?  You can create that same salad or the beautiful tower above using Melissa's Beets

I love making things from scratch and often do because I think it just tastes best that way.  However, I have to say Melissa's Beets tasted exactly like mine did.  No funny taste from packaging or coating, but like they just came from the oven with time to chill - all natural, with no additives or preservatives too.

Beets have a host of health benefits that you can review on my recent post, making them an ideal choice to add to your daily menu.

The recipe above was so simple, all the better for those days on the run or if company's coming unexpectedly for dinner.


BMT Tower
serves 4

Ingredients:

1 package of Fresh Mozzarella ball
1 large Heirloom Yellow Tomato
Arugula

Direction:

Slice each - Mozzarella, Beet and Tomato in 1/2 inch slices
Layer, starting with the tomato on the bottom, then beet slice, mozzarella and continue for a second layer.
Surround with Baby Arugula

Top with Champagne Vinaigrette or dressing of choice.  I like this dressing because it compliments the flavors of the salad without overpowering it.

Champagne Vinaigrette
serves 4

6 tbsp. Extra-Virgin Olive Oil
2 tbsp. Champagne Vinegar
2 tsp. honey
1 tsp. Grey Poupon
salt & pepper to taste
Blend and serve over salad.
Simple, quick and elegant!  What more could you ask for.
~ ENJOY ~

Don't forget to check out  my previous posts using Melissa's fabulous Produce.

Super PowerBowl
Cherimoya - Orgasmic and Addicting


Monday, 7 May 2012

Super PowerBowl!


My husband bikes A LOT even during the winter, so when summer comes and we head to the mountains he's ready to hit the hills and the biking events.  This Saturday he decided to enter a biking event about an hour from here that would take him into the hills of the wine country of Missouri.  With temperatures forecast to hit the 90s I decided to make a PowerBowl for dinner on Friday, so he'd have lots of good energy come early Saturday morning.

Thanks to Melissa's Produce for sending me the 100% Certified Organic Red Quinoa packed with 6 grams of protein, 28 grams of Carbohydrates and 2.5 grams of fat to make our meal complete.  In fact did you know:


Quinoa has been called the Complete Protein Nutrient Powerhouse because it's packed with all 8 essential amino acids, plus vitamins and minerals. In addition its:
  • high in potassium which helps control blood pressure
  • wheat and gluten free which is great for those suffering with celiac disease or wheat allergies
  • low on the glycemic index, which means it won't spike blood sugar levels because it enters our bodies at an even rate keeping us full longer
  • high in fiber
  • has a light fluffy texture and nutty flavor which makes this incredible grain delicious as well.
Adding Quinoa to our dinner on Friday was a great choice in lieu of what was in store for my husband Saturday morning.
    Before a race or strenuous activity it's important to have CARBOHYDRATES - which is the bodies main source of fuel, PROTEIN - that helps rebuild muscle tissue that's been broken down or damaged during exercise, FAT - that allows your body to sustain it's basic functions, WATER - to stay hydrated during exercise since the body loses water through sweat. Among other reasons. 
    For greater detail on this topic visit Livestrong, a great site for healthy living.

In addition to the quinoa, that I cooked according to the package directions, our dinner plates consisted of:

Bed of Raw Spinach, rinsed and spun dry
Grilled Boneless Skinless Chicken Breasts - lightly seasoned with canola oil, lemon juice, salt & pepper - sliced after grilling ( 4oz. piece = 26.7 grams of protein, 3.1 grams of fat and No Carbs.

Black Bean and Corn Salsa - click here for the recipe
1 Tablespoon Fresh Squeezed Lemon
3 Tablespoons Extra-Virgin Olive Oil
Salt & Pepper to taste

You don't have to be running a marathon or biking an event to have my PowerBowl.  This dish regardless, will provide you with energy to sustain you through the day and evening leaving you feeling full and nourished.


In fact, what's great about my PowerBowl is all the ingredients can be prepared in advance and kept refrigerated until ready to assemble - making it perfect to bring to work for lunch, if you've been running all day only to come home with little or no time to cook or for your family to gather quickly on their own.  Just open the refrigerator and toss together this light, healthy nutritious meal.

Use a simple dressing, your own favorite or no dressing at all.  It's that good. 

Enjoy!

Other dishes I've made using quinoa that you might enjoy are:

Black Quinoa Asian Slaw
Quinoa with Roasted Vegetables
Grilled Swordfish Kebobs with Black Bean, Corn and Quinoa Salad


Wednesday, 2 May 2012

Cherimoya - Orgasmic and Addicting!


Never in my life have I experienced such ecstasy as when I scooped out the creamy white flesh of a Cherimoya (pronounced chair-uh-MOY-yuh) and tasted it.  I know you're thinking "is she for real?"   I can't begin to describe the incredible flavor of this fruit.  My first spoonful, had me wondering if this tasted like a coconut, pineapple, banana, apple, or mango - YES, all of the above and then some. TOTALLY UNBELIEVABLE!!!   It's not too acidic or too sweet but just right.  Goldilocks and the Three Bears would be in 7th-heaven. 

The Cherimoya is the king of fruit with flavors more luscious than you could ever imagine plus contains a host of health benefits.  In fact, this ancient Incan fruit was once reserved for royalty.  So scrumptious that Mark Twain called it "deliciousness itself" or in other words, "the most delicious fruit known to man."


The Cherimoya resembles an artichoke in color and shape, with a leathery skin (not to be eaten) that has a scaly pattern.  Slice it open though and you will discover an ivory, firm custard-like flesh, also called "custard apple," with large black seeds that are not edible.


Choose Cherimoya that are firm and allow to ripen at room temperature. As the Cherimoya begins to ripen, the skin will begin to turn a darker green and will yield to gentle pressure, just like that of an avocado. Refrigerate softened Cherimoya and use within 2-4 days for best flavor.

I've been raving about this phenomenal piece of fruit but haven't mentioned how I discovered it!

Two weeks ago I received an email from Melissa's Produce asking me if I would like to try some of their products to test and share on my blog.  I was excited about this opportunity to test my culinary skills in creating dishes for fruits I wasn't familiar with, and two high protein grains as you know, I love to cook with.

The list of unique products were:

Cherimoya
Ojai Pixie Tangerines
Feijoas
Beets
Farro
Red Quinoa

You can find Melissa's Products in St. Louis at Dierbergs grocery stores or click here for a location in your state. If you can't find it at your grocery store request it from the produce manager.

Now that I've received these special culinary delights, "my mission" has been to sample and compose dishes both my family and readers will enjoy. 

During the course of the next 2 weeks I plan to share my creations and discoveries using these ingredients.  I hope you will try and enjoy them as much as my family has.

For my first recipe (below) I decided to pair the Cherimoya and Farro


I've prepared Farro before, a grain that resembles barley when raw, and love it's nutty flavor and chewy consistency.  Farro has been found to stimulate the immune system, lower cholesterol and help maintain blood sugar levels.   While farro does contain gluten, the gluten molecules are weaker than modern wheat, making it easier to digest.

Per ½ cup raw farro:
  • 1.5 g of fat
  • 0 g saturated fat
  • 0 mg of sodium
  • 34 g of carbohydrates
  • 5 g of dietary fiber
  • 2 mg of iron
  • 6 g of protein
  • 4 mg of niacin
  • 60 mg of magnesium
  • 2 mg zinc
In addition to minerals and vitamins, farro is rich in antioxidants, phytonutrients, lignans and betaine

After tasting the Cherimoya I searched recipes online.  All I found were sweet, dessert-type dishes, so I decided I'd concoct a savory dish. 

Let it be noted, the Cherimoya need not be disguised in any other form than in the raw.  It's flesh is like none other and will delight anyone that tries it.  But if you're inclined to fabricate dishes like I am, I think you'll enjoy this recipe without sacrificing the flavor of the Cherimoya.

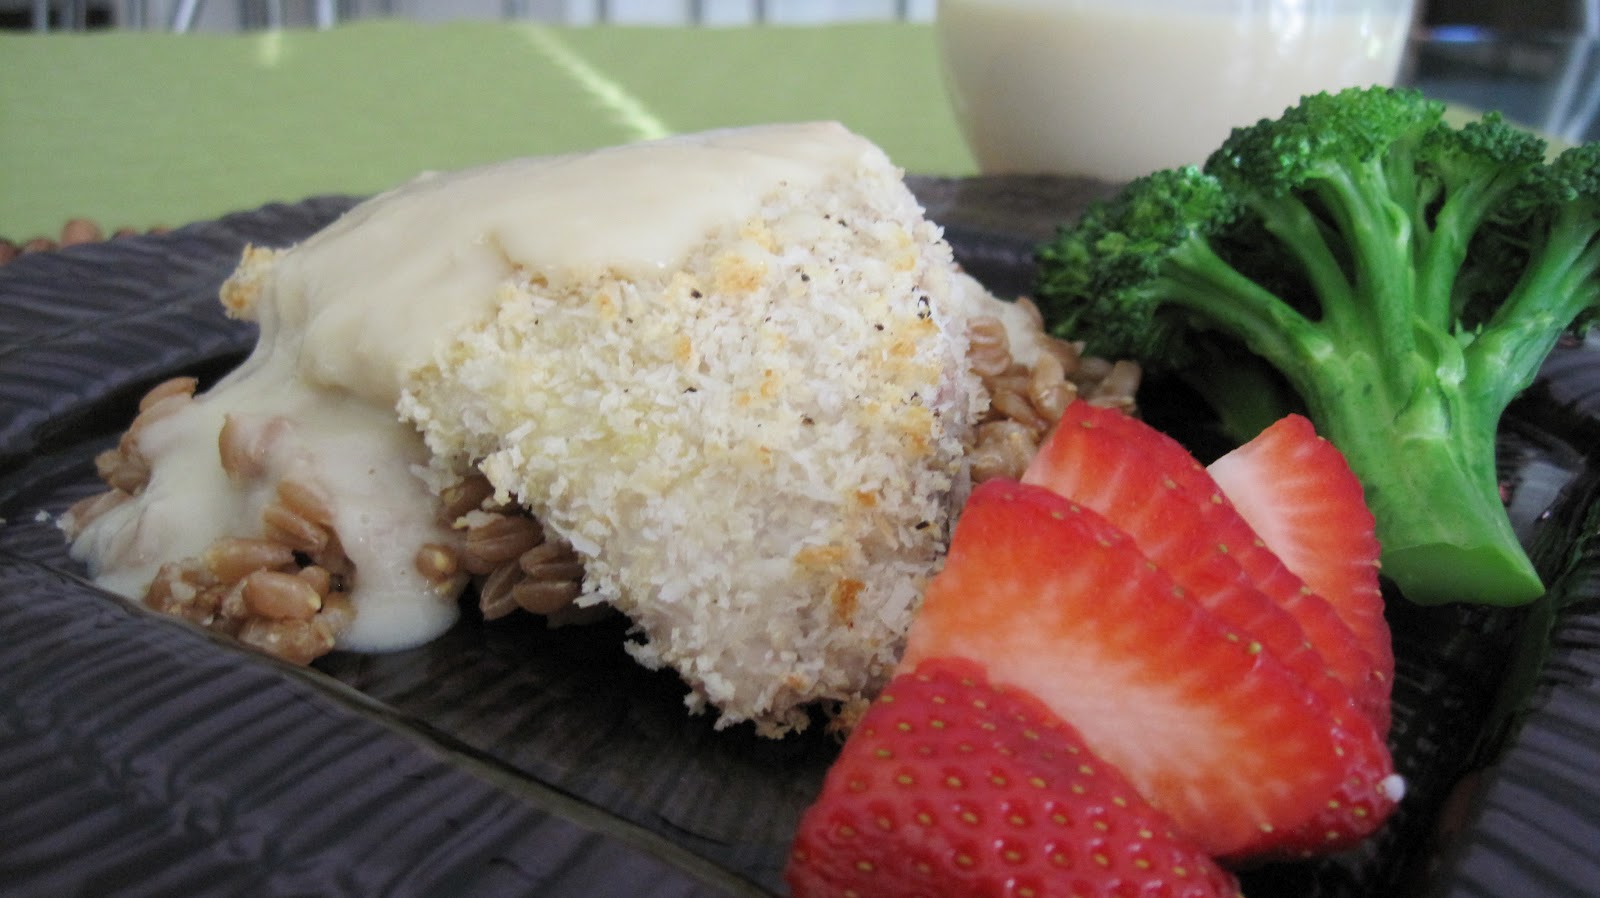
With the Cherimoya's tropical flavors I wanted to feel like I was in paradise so I designed:


"Coconut Encrusted Tilapia
on a Bed of
Farro with a Cherimoya Sauce"


Ingredients:

4 (8 oz.) pieces of Tilapia
1 pkg. of Melissa's Farro (follow package instructions)
3/4 cup Panko Bread Crumbs
3/4 cup Unsweetened Organic Coconut
salt and pepper
1 egg
1 tablespoon milk

Sauce:

2 Cherimoya, seeds discarded, flesh removed and set aside
1/2 cup unsalted chicken stock
2 teaspoons Dijon Mustard
2 teaspoons dry mustard
1/2 cup Yuzu Rice vinegar (or regular rice vinegar)
1/3 cup canola oil
salt and pepper to taste

Directions:

Heat oven to 350F degrees.  Line pan with foil and spray with non-stick spray

Follow package directions for Farro 15 minutes prior to putting fish into the oven.  Farro will take approximately 30 minutes to prepare.  This way everything will be ready at the same time. (Season as desired.  I didn't season it with anything - I like it as is).

Combine milk and eggs in a bowl and whisk together


Combine Panko and Coconut in another bowl and combine


Dip Tilapia pieces one at a time in the egg mixture, then into the Panko/Coconut mixture, season with salt and pepper and place on lined sheet pan, until all pieces have been coated.

Bake for 15-18 minutes, uncovered.

Sauce:

Heat chicken stock and reduce down to 1/4 cup.  Set aside to cool.

Once stock has cooled, combine first 5 sauce ingredients in blender and puree until smooth.  Then slowly add in the canola oil while blender is running on low speed.  Add salt and pepper to taste.  Set aside until ready to serve.

The Cherimoya sauce looks like thick cream but as you can see there's nothing unhealthy in this sauce.  It's delicious!  Makes about 2 cups of sauce.


To Plate:

Place Farro on plate, top with Tilapia and drizzle Cherimoya Sauce over the top.  I also served this with fresh strawberries that I blended together as I ate.  Serve with fresh veggie of choice. 

This dish was a true delight!  I felt like I was in the tropics.

Note: Cherimoya is incredibly delicious raw.  Please try it plain, my recipe or create your own.

Farro, can be served plain, combined with other vegetables or fruits to make a nice light and healthy salad, in soups or any way you can think of.

I hope you'll check out Melissa's for a store near you.  With unique products like these you won't want to miss out!

Enjoy!