Pages

Showing posts with label Grains. Show all posts

Wednesday, 2 May 2012

Cherimoya - Orgasmic and Addicting!


Never in my life have I experienced such ecstasy as when I scooped out the creamy white flesh of a Cherimoya (pronounced chair-uh-MOY-yuh) and tasted it.  I know you're thinking "is she for real?"   I can't begin to describe the incredible flavor of this fruit.  My first spoonful, had me wondering if this tasted like a coconut, pineapple, banana, apple, or mango - YES, all of the above and then some. TOTALLY UNBELIEVABLE!!!   It's not too acidic or too sweet but just right.  Goldilocks and the Three Bears would be in 7th-heaven. 

The Cherimoya is the king of fruit with flavors more luscious than you could ever imagine plus contains a host of health benefits.  In fact, this ancient Incan fruit was once reserved for royalty.  So scrumptious that Mark Twain called it "deliciousness itself" or in other words, "the most delicious fruit known to man."


The Cherimoya resembles an artichoke in color and shape, with a leathery skin (not to be eaten) that has a scaly pattern.  Slice it open though and you will discover an ivory, firm custard-like flesh, also called "custard apple," with large black seeds that are not edible.


Choose Cherimoya that are firm and allow to ripen at room temperature. As the Cherimoya begins to ripen, the skin will begin to turn a darker green and will yield to gentle pressure, just like that of an avocado. Refrigerate softened Cherimoya and use within 2-4 days for best flavor.

I've been raving about this phenomenal piece of fruit but haven't mentioned how I discovered it!

Two weeks ago I received an email from Melissa's Produce asking me if I would like to try some of their products to test and share on my blog.  I was excited about this opportunity to test my culinary skills in creating dishes for fruits I wasn't familiar with, and two high protein grains as you know, I love to cook with.

The list of unique products were:

Cherimoya
Ojai Pixie Tangerines
Feijoas
Beets
Farro
Red Quinoa

You can find Melissa's Products in St. Louis at Dierbergs grocery stores or click here for a location in your state. If you can't find it at your grocery store request it from the produce manager.

Now that I've received these special culinary delights, "my mission" has been to sample and compose dishes both my family and readers will enjoy. 

During the course of the next 2 weeks I plan to share my creations and discoveries using these ingredients.  I hope you will try and enjoy them as much as my family has.

For my first recipe (below) I decided to pair the Cherimoya and Farro. 


I've prepared Farro before, a grain that resembles barley when raw, and love it's nutty flavor and chewy consistency.  Farro has been found to stimulate the immune system, lower cholesterol and help maintain blood sugar levels.   While farro does contain gluten, the gluten molecules are weaker than modern wheat, making it easier to digest.

Per ½ cup raw farro:
  • 1.5 g of fat
  • 0 g saturated fat
  • 0 mg of sodium
  • 34 g of carbohydrates
  • 5 g of dietary fiber
  • 2 mg of iron
  • 6 g of protein
  • 4 mg of niacin
  • 60 mg of magnesium
  • 2 mg zinc
In addition to minerals and vitamins, farro is rich in antioxidants, phytonutrients, lignans and betaine. 

After tasting the Cherimoya I searched recipes online.  All I found were sweet, dessert-type dishes, so I decided I'd concoct a savory dish. 

Let it be noted, the Cherimoya need not be disguised in any other form than in the raw.  It's flesh is like none other and will delight anyone that tries it.  But if you're inclined to fabricate dishes like I am, I think you'll enjoy this recipe without sacrificing the flavor of the Cherimoya.

With the Cherimoya's tropical flavors I wanted to feel like I was in paradise so I designed:


"Coconut Encrusted Tilapia
on a Bed of
Farro with a Cherimoya Sauce"


Ingredients:

4 (8 oz.) pieces of Tilapia
1 pkg. of Melissa's Farro (follow package instructions)
3/4 cup Panko Bread Crumbs
3/4 cup Unsweetened Organic Coconut
salt and pepper
1 egg
1 tablespoon milk

Sauce:

2 Cherimoya, seeds discarded, flesh removed and set aside
1/2 cup unsalted chicken stock
2 teaspoons Dijon Mustard
2 teaspoons dry mustard
1/2 cup Yuzu Rice vinegar (or regular rice vinegar)
1/3 cup canola oil
salt and pepper to taste

Directions:

Heat oven to 350F degrees.  Line pan with foil and spray with non-stick spray

Follow package directions for Farro 15 minutes prior to putting fish into the oven.  Farro will take approximately 30 minutes to prepare.  This way everything will be ready at the same time. (Season as desired.  I didn't season it with anything - I like it as is).

Combine milk and eggs in a bowl and whisk together


Combine Panko and Coconut in another bowl and combine


Dip Tilapia pieces one at a time in the egg mixture, then into the Panko/Coconut mixture, season with salt and pepper and place on lined sheet pan, until all pieces have been coated.

Bake for 15-18 minutes, uncovered.

Sauce:

Heat chicken stock and reduce down to 1/4 cup.  Set aside to cool.

Once stock has cooled, combine first 5 sauce ingredients in blender and puree until smooth.  Then slowly add in the canola oil while blender is running on low speed.  Add salt and pepper to taste.  Set aside until ready to serve.

The Cherimoya sauce looks like thick cream but as you can see there's nothing unhealthy in this sauce.  It's delicious!  Makes about 2 cups of sauce.
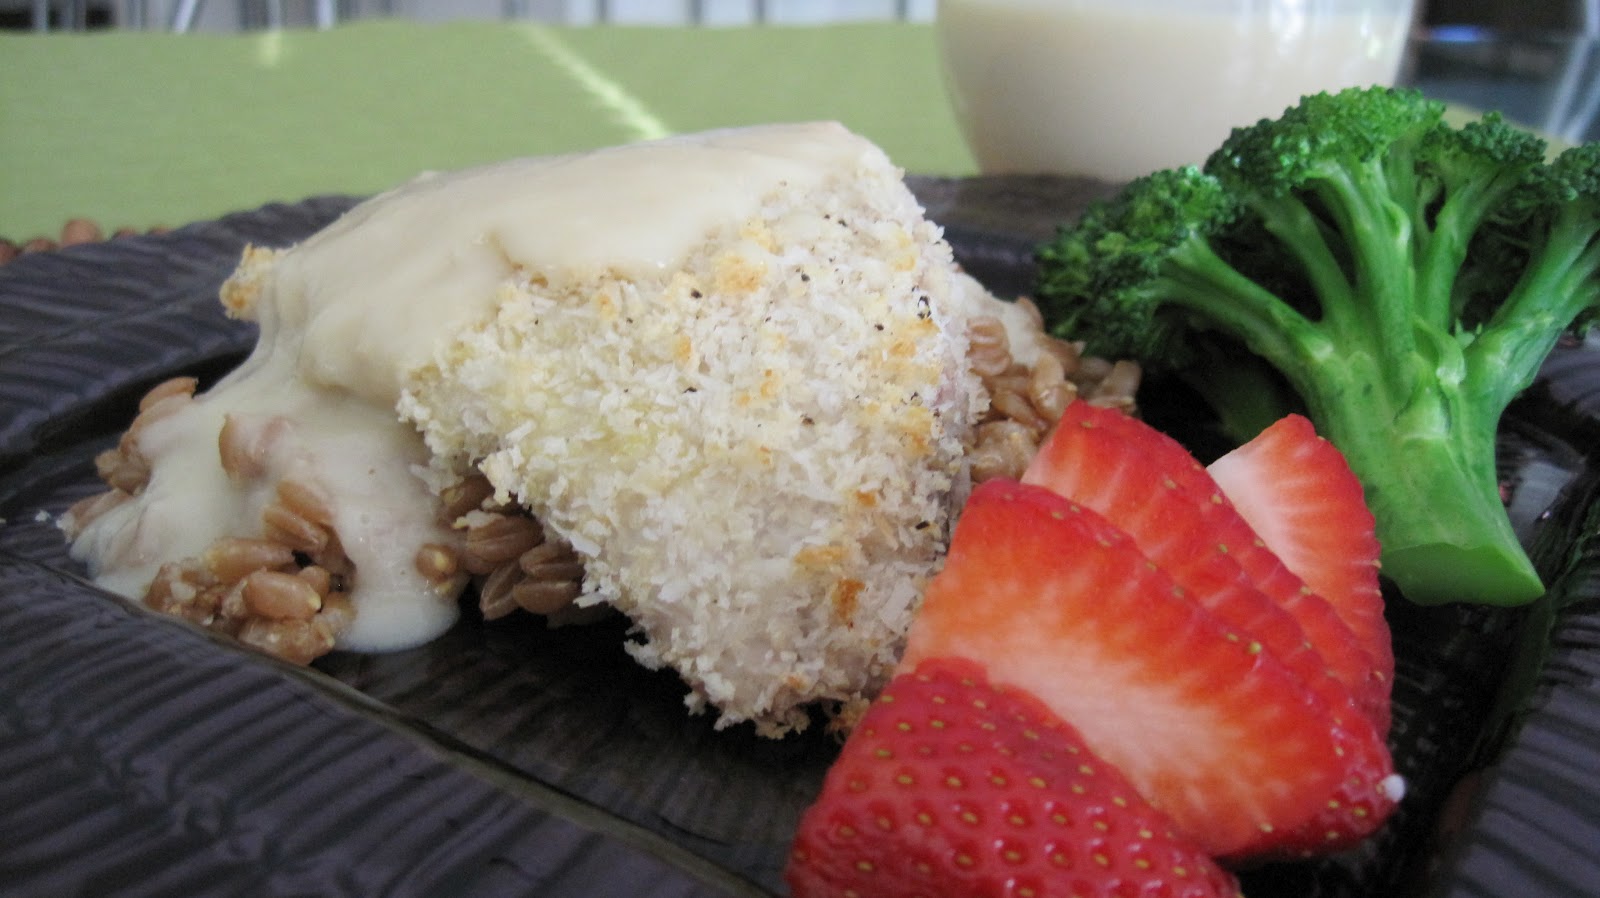


To Plate:

Place Farro on plate, top with Tilapia and drizzle Cherimoya Sauce over the top.  I also served this with fresh strawberries that I blended together as I ate.  Serve with fresh veggie of choice. 

This dish was a true delight!  I felt like I was in the tropics.

Note: Cherimoya is incredibly delicious raw.  Please try it plain, my recipe or create your own.

Farro, can be served plain, combined with other vegetables or fruits to make a nice light and healthy salad, in soups or any way you can think of.

I hope you'll check out Melissa's for a store near you.  With unique products like these you won't want to miss out!

Enjoy!


Tuesday, 13 March 2012

Ultimate Rice Cooker Cookbook Giveaway


Last week I posted a recipe for Wheat Berry Salad with Orange Glazed Chicken.  Many of you are well aware when cooking certain types of grains it can take hours.  It wasn't until I prepared this Wheat Berry Salad that I learned I could utilize my rice cooker to do the task. I thought rice cookers were just for rice!

Babysitting my stove for 1 1/2 hours isn't my idea of fun, especially if walking away can lead to stuck burnt grains on the bottom of my pot.  But, I was thrilled to read that there is a cookbook dediciated to all the foods you can prepare in your rice cooker.  Now my rice cooker doesn't have to be an appliance that collects dust most of the time but one that can be used often.

Beth Hensperger and Julie Kaufmann who wrote "The Ultimate Rice Cooker Cookbook" share 250 No-Fail recipes from breakfast dishes straight through to dinner and dessert all using your handy little rice cooker.

For those of you that don't have a rice cooker I highly recommend getting one.  Up to now I used mine most often when teaching sushi classes to make sushi rice or at home for jasmine rice.  Rice comes out perfect every time, and all I have to do is put in the rice with water and turn on - the machine does the rest.

Rice cookers come in a broad range of prices however, you don't have to purchase the most expensive one.  In fact, I've seen them for as low as $7 at Walgreens and Target and have personally used those with great success.  The one I currently own was given to me as a gift from my sister.  It was a bit pricey but works like a charm.  I've had mine for probably 20 years. 

If you cook any type of grain at all, do yourself a favor - purchase a rice cooker and sign up for my giveaway.  Of course if you've already got one you definitely want to enter for your chance to win this fantastic cookbook. 

In it's 10th Anniversary edition Hensperger and Kaufmann will help you make Risotto, Polenta, Chilis, Soups, Porridges, Puddings, dishes like Steamed Halibut Steaks and Scallops with Sweet Red Pepper Sauce, Tamales, Poached Dried Figs in Red Wine Sauce among so many others.  Who knew your rice cooker could be so versatile?  No me!

For your chance to win The Ultimate Rice Cooker Cookbook simply post a comment letting me know why you'd like to win this cookbook, and if you own a rice cooker what dishes you currently prepare in it?

For a second chance to increase your odds of winning, "Like Me" on Facebook and post in the comments section below.

For a third chance of winning, "Follow By Email" in the top right of my blog and post a comment letting me know.

The giveaway for The Ultimate Rice Cooker  Cookbook will be selected at Random on Monday, March 19th, 2012. Please be sure when posting your comment to provide a link where you can be contacted.  This way in the event you win The Ultimate Rice Cooker Cookbook I'll be able to reach you for your mailing address.

Remember, if you don't win you can always purchase the book on Amazon.

Good Luck!

THE WINNER OF THE ULTIMATE RICE COOKER COOKBOOK IS:


CONGRATULATIONS NAMI!

Friday, 2 March 2012

Nutritious Wheat Berry Salad with Orange Glazed Chicken


Have you ever had Wheat Berries?  They are utterly delicious!  This whole grain is nutty, chewy, has a hearty flavor and texture, slightly sweet and so nutritious.

Wheat Berries contain the entire wheat kernel (except for the hull), comprising the bran, germ, and endosperm.   The germ contains natural oils that can go rancid when exposed to air, so proper storage is necessary. 

Wheat Berries have a tan to reddish brown color and are available as either a hard or soft processed grain. Containing beneficial minerals such as iron and magnesium, B vitamins, vitamin E, antioxidants, and fiber.  While fiber isn't digested easily it does help with your digestion and keeps you feeling full longer which is helpful if you're trying to lose a few pounds. 

Having a diet rich in whole grains significantly reduces the risk of heart disease, type 2 diabetes and stroke in addition to reducing the risk of certain cancers and obesity while lowering cholesterol levels.. 

Wheat Berries are often added to salads, baked into bread to add a crunchy texture or added to stews.  It's important to plan ahead when preparing whole grains since many require hours of soaking. 

Hard Red Wheat Berries require soaking 8-24 hours ahead.  I covered mine with water - with about 2 inches above the grains, first thing in the morning.  Two hours before dinner I drained them and placed 1 cup Wheat Berries with 2 1/2 cups water in a rice cooker.  You can cook them in a crock pot, pressure cooker, on the stove top or microwave.  For various cooking methods and instructions view here.  I'm lazy and don't like to stand over them so I used my rice cooker and let it do all the work. 

To bring out their nutty flavor you can even toast them in a skillet prior to cooking. 

I cooked 1 cup of  dry Wheat Berries (that had been soaked)  yielding approximately 3 cups cooked.  If you'd like to make a larger batch to save for later, it would be necessary to store the cooked Wheat Berries in a jar with tight fitting lid, for up to 5 days in the refrigerator.  You can also freeze them for up to 3 months then simply defrost in the microwave or refrigerator overnight.  To reheat in the microwave place in 1/4 inch of water, cover and heat over medium-low until they are softened and warm.

Note: If you forget to soak the Wheat Berries ahead of time you can also use the quick soak method like you would with beans.  Placing Wheat Berries in a pot, covered with an inch of water, bring to a boil and cook for 2 minutes.  Remove from heat, cover and let stand for 1 hour.  Drain and cook as directed.

If you're like me and only cook what you're eating, then I recommend you store your dry Wheat Berries in a jar or container with a tight fitting lid.  Store in a cool, dry pantry for up to several months.  Since whole grains can go rancid,  you could store them in the refrigerator but it's not necessary

Hopefully these tips will help insure that you make perfect Wheat Berries.  On to the recipe!

Back in the late 70s, Julee Rosso & Sheila Lukins came out with The Silver Palate Cookbook which became a bible in everyone's kitchen.  One recipe I have used over and over again is called "Nutted Rice."  I love this recipe and so does everyone that's ever tasted it.  I've tweaked it numerous times but when deciding to make a Wheat Berry Salad I thought of this recipe.  Of course  I've changed most every ingredient in this but, it was the Nutted Rice recipe that inspired me to make my Wheat Berry Salad.  I think you'll enjoy it.


Besides Wheat Berries being packed with protein and nutrition I've added other heart healthy ingredients to this salad.  I love the addition of fresh and dried fruits to my salads whenever I can, which makes them naturally sweet.  If you aren't familiar with  Plum Amazins they're diced dried plums that have 50% more fiber, 19% fewer calories amd 50% less sugars' than raisins and cranberries AND they're delicious!  I decided to opt for these luscious little morsels to add that extra pizazz to my salad.  With the addition of a fresh fruit vinaigrette and almonds it makes it next to impossible to stop eating.

Wheat Berry Salad
serves 6

Ingredients:

1 cup Wheat Berries (found at Whole Foods or Bob's Red Mill),
2 1/2 cups water
1 cup slivered, blanched almonds
1 cup SunSweet plum Amazins
zest of 1 large orange
4 scallions, thinly sliced
1/4 cup olive oil
1/3 cup fresh squeezed orange juice
salt and pepper to taste


Instructions:

Soak Wheat Berries for 8-24 hours in a pot of water covering 2 inches above the grains.  Drain and place in desired vessel with water, following cooking instructions.  Wheat Berries should take about 1 - 1 1/2 hours to cook unless using a pressure cooker.

Transfer cooked Wheat Berries to a bowl adding the rest of the ingredients.  Let stand for at least 30 minutes to absorb the flavors.  Serve at room temperature.

I think you'll love this salad.

Since I've included so much information here I think in a couple of days I'll go ahead and post my Orange Glazed Chicken that I made to go with this.  So stay tuned.

Wednesday, 2 November 2011

Stewing Over the Weather!


We've had a pretty good run on mild weather this fall.  As I walked my dogs this morning the red, yellow and orange leaves on the trees glistened in the sunlight. While the cool breeze and rustling of leaves on the ground felt so comforting.  Yet, this evening we are expecting storms with temperatures dropping from the mid 70s (unusual for this time of year) down into the 30s overnight, with highs tomorrow only near 50. 


Time to say goodbye to the beautiful leaves. Almost instantly the trees will be bare as the leaves fall to cover the earth.


In anticipation of  the approaching fall chill, I decided to cook something warm and soothing for dinner - Beef Barley Stew.


To stew  typically means that the dish contains meat, vegetables and a thick soup-like broth resulting from a combination of the stewing liquid and the natural juices of the food being stewed. It's a method of cooking of which food is barely covered with liquid and simmered slowly for a long period of time in a covered pot. Stewing not only tenderizes tough pieces of meat but also allows the flavors of the ingredients to blend perfectly making a luscious one pot meal.


Barley which is prominent in this dish, is a whole grain, rich in protein, vitamins, minerals and amino acids essential for our health. More importantly, barley is one of the richest sources of both soluble and insoluble fiber.

Insoluble fiber aids in proper excretion of waste products in the body, while soluble fiber (known as beta glucan) mixes with liquid, binds to fatty substances and allows them to leave the body. Barley is also seen rich in tocotrienols, an antioxidant that helps lessen risk for contracting heart disease and cholesterol problems. (More facts about Barley)

In addition to barley, many nutritious vegetables are present in this stew - celery, carrots, mushrooms, garlic and onions.  When seeking a hearty soup loaded with veggies I recommend this thick, luscious, Beef Barley Stew!


Tip: 

If  making this dish, don't try to rush it. Take your time and allow the stew to cook slowly over a low heat for optimal flavor and tenderness of the meat and vegetables.


I find it's best to make stew the day before then after cooling, place in the refrigerator covered, overnight. An hour before serving set the pot back onto the stove and heat up slowly, stirring often so the bottom doesn't burn. The results are heavenly!

Here's the recipe, I hope you like it:

Beef Barley Soup
serves 6

Ingredients:

  • 3 lb. meaty beef or veal shanks
  • 3 large yellow onions, chopped
  • 6 carrots, peeled and chopped
  • 4 celery stalks, chopped
  • 1 cup tomato puree
  • 1 cup barley
  • 6 Tbs. (3/4 stick) unsalted butter (could substitute olive oil  by 1/2 but butter tastes best)
  • 1 lb. fresh cremini mushrooms (baby bellas), brushed clean and sliced
  • 1 clove garlic, minced
  • Salt and freshly ground pepper, to taste
  • 4 Tbs. chopped fresh dill
  • 1/4 cup chopped fresh flat-leaf parsley
  • 6 Tbs. sour cream (optional)

Directions:

Place the shanks (or beef stew meat) in a saucepan and add water to cover generously. Bring to a boil over high heat, skimming often to remove any foam that forms on the surface. (Never allow a stock to boil. As meat and bones cook, they release proteins and fats into the surrounding liquid.... At a slow simmer, these components appear as scum on top of the stock and can be skimmed. If the stock is boiling, these substances are churned back into the stock and become emulsified. The resulting stock is cloudy and has a dull, muddy, greasy flavor, which will only worsen if the stock is reduced  for a sauce").  


Add about two-thirds of the chopped onions, the carrots and celery, reduce the heat to low and cook, uncovered, for about 1 hour. Add the tomato puree and barley, cover partially and continue to cook over low heat until the barley is tender, about 1 hour more.


While the soup is cooking, in a large sauté pan over medium heat, melt the butter. Add the remaining chopped onions and sauté, stirring occasionally, until pale gold, 10 to 12 minutes. Raise the heat to high, add the mushrooms and sauté, stirring often, until softened, 6 to 8 minutes. Add the garlic, reduce the heat to medium and sauté until soft but not brown, about 3 minutes more. Season with salt, pepper and 2 Tbs. of the dill.

Remove the shanks from the pan (if using) and, when cool enough to handle, cut the meat from the bone. Chop and reserve the meat; you should have about 1 1/3 cups.


Add the mushroom mixture and the reserved meat to the pan and stir to heat through. Season with salt and pepper.

Garnish with sour cream and parsley if desired.

Note: I used beef stew meat. However, for a more superior flavor use beef or veal shanks. If using beef stew meat there's no need to remove the meat after it's been cooked to cut into bite size pieces. The beef stew meat already comes that way.

Enjoy!

Wednesday, 19 October 2011

Black Quinoa Asian Slaw


One of my favorite places to grocery shop is Whole Foods Market.  Everything they have in my opinion is incredible.  Walking into the produce section is like walking into a carnival of bright, fresh, fruits and vegetables stacked neat and clean but in perfect view and reach for everyone.  With samples galore and the friendliest staff ever. 

Of course, you do pay a premium for the quality but it's worth it to go when you can.

The other day I arrived just after the lunch hour.  I was starved having not had anything to eat since 6:30am.  I looked at the soups and although it was chilly out I felt like something light and refreshing.  I headed over to the prepared foods section and their Black Quinoa Asian Slaw caught my eye.  It was positively stunning with the black balancing the bright vegetables and fruit mixed in.  The woman behind the counter said it was delicious so I tried it.  AMAZING!!!!

Of course after coming home I looked at the ingredients and then got online to see if that recipe was posted anyplace.  I found it!  I went back out to Whole Foods to get some Black Quinoa and the other ingredients.  I had the regular pale quinoa but the black made this dish stand out. 

A simple dish to prepare and packed with nutrients.  Did you know: 

  • Quinoa is the only grain that is a complete protein, with all eight essential amino acids 
  • Has a rich color and unique texture, adding value to any plate. 
  • Has an earthy somewhat nutty flavor and crunchy texture 
  • It's been called the "Mother Grain" by the ancient Incas, and a staple in their diet
  • Quinoa is Kosher
  • Perfect addition to all cuisines and vegetarian dishes
  • High in potassium which helps control blood pressure
  • Wheat and gluten free which is great for those suffering with celiac disease or wheat allergies
  • Low on the glycemic index, which means it won't spike blood sugar levels because it enters our bodies at an even rate keeping us full longer
  • High in fiber
Note: Some caution must be taken however, when prepping your quinoa. Because the grains are covered with "Saponin"  a naturally occurring chemical compound common to plants, you must be careful to remove it.  (Saponin functions as a natural pest control by being virtually unpalatable, preventing birds and insects from eating it).   If not removed (by simply rinsing it well under water in a fine mesh sieve prior to cooking), it will taste bitter and can have minor toxic effects, causing stomach aches and sometimes vomiting. A good rinse before cooking (being sure the water runs clear) and even after will insure that all the Saponin is removed. Leaving you with a healthy, nutritious and delicious grain to eat.

Black Quinoa Asian Slaw
serves 10-12

Ingredients

  • 8 oz  Black Quinoa
  • 2 c. water
  • 4 oranges, segmented
  • 2 c. red cabbage, shredded
  • 1 c. snap peas, bias cut
  • 1 c. carrots, shredded
  • 1 c. scallions, bias cut
  • 1 mango, small dice
  • 1/2 c. fresh cilantro, rough chopped
  • 2 T fresh ginger, minced
  • 1/2 c. orange juice, reserved from orange segment
  • 1 t Sriracha sauce
  • 1/4 c. rice wine vinegar
  • 1/4 c. sesame oil
  • sesame seeds to garnish, toasted

Directions

1. Rinse Black Quinoa under cold water until water runs clear. Place Black Quinoa in boiling water and simmer for 12-15 minutes. Rinse again.
2. In a small bowl combine orange juice, rice wine vinegar and ginger. Slowly whisk in sesame oil to create an emulsion. Set aside to incorporate flavors in dressing.
3. In a large bowl combine Black Quinoa, red cabbage, snap peas, carrots, scallions,mangos, and cilantro.
4. Fold in dressing and let chill in fridge until ready to serve.  To serve, garnish with toasted sesame seeds if desired.

I think this is delicious on it's own but would be a great addition to any meal as a side dish or with chicken or fish added to it.

Beautiful, Nutritious and Delicious!

Here are more Quinoa recipes you might like to try.

ENJOY!!!