Pages

Wednesday, 24 October 2012

Giveaway - Cuisinart Smart-Stick Hand Blender


During the fall I find I make soup at least 2 times a week, sometimes more.  There's something about a hot bowl of soup that's so comforting.  One of my favorite tools to use when I need to  purée soup or even smoothies is my Cuisinart Smart-Stick Hand Blender.  

Before I had the Cuisinart Hand Blender, when puréeing soups I would then have to use a ladle to transfer the chunky soup (often hot) into a stand blender.  I disliked this for 2 reasons:
  1. I had to clean another container - UGH!
  2. I had to be careful that the liquid wouldn't explode out of the top of the blender since it was hot.  I was always careful though and put a towel over the lid just in case it came bursting out.
Now  puréeing is so simple.  Just put the Cuisinart Smart-Stick directly into the pot (no transferring), and blend away.


Once  puréed , simply remove the blender from the pot, separate the blender attachment, wash and store.  That's it!  Then I'm ready for my soup.

A favorite is my Butternut Squash soup for recipe view here.


You can also blend ingredients directly in pitchers, bowls, or the clear plastic beaker that’s included with the blender. For something so small it has a  powerful 200-watt motor that operates with an easy one-touch control. It blends drinks, purées soup, mixes pancake and crêpe batters in seconds! Plus you can put both the stainless steel blending shaft and beaker in the dishwasher! What could be easier?

Cuisinart was nice enough to offer me a one of their Smart-Stick Hand Blenders to giveaway this week on my blog.  Participants must live in the United States.  If you're the winner, Cuisinart will ship it directly to you in one of their new fall colors.  Have you seen all the colors they have?  They're so much fun, along with all their other appliances - bright and cheerful!  They make you smile while you're cooking!

The giveaway starts today and ends on Monday at Midnight EST/ 11:00 pm. central time.  The winner will be notified by email and have 48 hours to respond otherwise, I'll have to select another winner at Random.  I'd hate to do that so be sure to sign in with an address you check frequently.

This giveaway will be conducted through Rafflecopter.  Just follow the prompts below and the rest is simple.

Good Luck!


Sunday, 21 October 2012

Savory Layered Vegetable Torte


It's that time again for the 5 Star Makeover sponsored by Natasha and Lazaro.  This month they have chosen Butternut Squash as our challenge.  


Butternut Squash (shown above) is a vegetable we have in our home all the time.  Weighing in at about 2-3 pounds, this cylindrical winter squash looks somewhat like a very large pear, approximately 8 to 10 inches long, and 3 to 5 inches wide.  The exterior has a tough, yet smooth camel colored skin; the flesh is sweet and orange.  

The majority of time I prepare it simply by cutting it into cubes (you can view my demonstration video here), tossed lightly with olive oil and roasting it in a 425F degree oven for 20-30 minutes until it's caramelized. However, it can also be baked, steamed, simmered or even tossed in a pan and placed on the grill. 

When I first read about the October challenge I thought up numerous recipes, but decided on a recipe I frequently prepare for family, guests or luncheons that everyone raves about. With Butternut Squash at it's peak this time of year, I used that in place of portobello mushrooms (which I typically use) for a savory layered vegetable torte.  My other dish is called a Torta Rustica, mainly because it's put together free form style, while my Vegetable Torte is neatly layered in a springform pan - considerably easier to prepare, and teach to the world. 

If you're a fan of vegetables you will love this recipe. Although it has several steps, it's quite simple to assemble, and can be made days ahead, then hours before serving, simply remove from the refrigerator and allow to reach room temperature.  Of course, you can prepare it and serve it hot the same day.

Feel free to substitute with veggies of your choice, or if you like, add ground beef, sausage, bacon, etc. to the mix.  I made it easy on myself and used a Pillsbury Pie Crust, easy and always delicious, in lieu of making my own this time.  I hope you enjoy it.

Here's the recipe.......


Savory Layered Vegetable Torte
serves 8-10

Ingredients:

4 (10 oz.) packages frozen chopped spinach, thawed and squeezed dry
1 tbsp. butter
1/4 tsp. fresh grated nutmeg
2 tbsp. olive oil, divided
1 shallot, minced
4 eggs, 3 beaten (can use egg whites), 1 for egg wash
1 cup fresh grated Parmesan cheese
1 1/4 cups bread crumbs, (I used Progresso, plain), divided
kosher salt & fresh ground pepper to taste
4 Red Bell Peppers, roasted then thinly sliced
1/2 pound Fontina cheese, shredded
4 oz. Goat Cheese, crumbled
1 Butternut Squash, peeled and cut into 1/4 inch cubes
1 box, Pillsbury Pie Crust or homemade dough

Directions:   Preheat oven to 375F degrees

Mise en Place all ingredients, this will make the prep work that much easier.  
  • Roast the Red Peppers, peel skins and slice into 1/4 inch strips (if preferred you can purchase jarred - then slice) Set aside
  • Roast Butternut Squash in 425F degree oven for 20-30 minutes until soft.  Remove from oven, Set aside and allow to cool. 
  • Saute butter and shallot together in a saute' pan, remove from heat and add spinach, nutmeg, eggs and Parmesan cheese. approximately 1/4 cup bread crumbs or just enough to soak moisture - but not dry.  Blend all together.
Using a 10" Springform pan dot bottom center with non-stick spray, line bottom of pan with circle of parchment, then spray interior, sides and bottom of pan.

Take one roll of Pillsbury Pie dough from box and roll out dough approximately into a 15" round with additional overhang all the way around.   

Layer the filling in this order:
  • Lay dough in springform pan, tucking into corners and hanging over the sides
  • sprinkle with 1/4 to 1/2 cup bread crumbs


  • Layer with 1/3 of spinach mixture


  • Place 1/2 of the strips of Roasted Red Peppers over spinach


  • Spread 1/2 the Roasted Butternut Squash over the Roasted Red Pepper


  • Top with 1/2 each of the shredded Fontina and crumbled Goat Cheese


  • Repeat layers adding, 1/3 spinach, 1/2 Roasted Red Peppers, 1/2 Butternut Squash, 1/2 each of Fontina and Goat Cheese, final 1/3 of Spinach mixture

  • Top with 1/4 to 1/2 cup of bread crumbs, then pulling the remaining dough over the spinach and bread crumbs.


  • Remove second roll of dough from box and roll into large circle enough to cover top of pan with 1 1/2 inch overhang all the way around.  Lay dough over top and gently tuck remaining dough into outer edges of pan, being careful not to tear dough.

  • Cut hole in the center and 5 slits around the hole for venting.


  • Taking 1 egg with a bit of water whisk and brush over dough (egg wash).


  • Bake for 1 hour or until the crust is a deep golden color.  Remove from oven and allow to cool for about 15 minutes.  


  • Remove sides of Springform pan and gently flip over (placing plate over top) and remove bottom and parchment.  Flip right side up and set on serving platter.  

Slice and serve.


Note:  If making ahead leave in springform pan.  When ready to serve, follow above directions and then display on platter.

Enjoy!

Monday, 15 October 2012

I NEED YOUR HELP!!!


As a member of the IACP I was invited to submit one of my recipes with photo, for a chance to win my own $15,000 iOS culinary app from MobileSkillet.com.   If I win, my app will be placed on iTunes for the world to see and purchase.  

I found out a few days ago that I was a semi-finalist and the photo I submitted (above), would be posted on the Mobile Skillet page of Pinterest.  As part of the contest, they've asked us to invite our family, friends and your friends, to "like" and "repin" our photos. The top 10 with the most points and who meet other specified criteria, will make it to the finals.

Of course, I'd love to win this app.  It would be so exciting, to be able to take my passion to the next level - having the opportunity for others, worldwide, to view my recipes from their iPhones and iPads as they walk through the isles at the grocery store, and while cooking in their kitchen.  "At Home with Vicki Bensinger" could literally be in homes everywhere.  It would be AMAZING!

If you have 2 minutes to spare please click  HERE. Where you see the photo above, click "like" and "repin" to a board on your Pinterest page.  If you aren't a member of Pinterest no worries, you can easily join and then "like" and "repin" my photo. 

If I WIN, I promise, I will find a way to reward everyone that voted for me.  I haven't decided what that will be, but I promise to do that.  You can hold me to it! The winner will be notified mid November.


Thank you so much for helping me. I really do appreciate it!  

Wednesday, 10 October 2012

Giveaway & Cranberry Orange Bread!


Have you ever noticed that once fall is in the air your eating habits change?  Instead, you find yourself gravitating towards hot soups, breads, oven cooked savory dishes and baked desserts.  Well, maybe not all of you, but definitely "yours truly."

I had been planning to bake some Cranberry Orange Bread when I received an email about a new tool on the market that I knew I needed to try.

Do you like zesters?  I love them and use them all the time especially when zesting oranges, lemons and limes.  This particular tool called the "Better Zester" by Edgeware, is amazing! I love this zester and believe me I've tried them all.


I love that it zests without getting the pith - this is because of the v-etched teeth


that just skim across the surface of the citrus.  Plus, it has a measuring compartment so you don't have to fuss with shoving it into a measuring spoon only to get 1/2 of the zest stuck to your fingers.  Even better, when I went to clean it, I didn't have to worry about shaving my fingers, which I found incredible. No Band-Aids needed!


The Better Zester can be found at Williams-Sonoma and online, and retails for $14.95.  However, I have an extra one to GIVEAWAY to one very lucky person.  All you have to do is post a comment telling me why you'd love to win the Better Zester, and:

  • Like Edgeware on Facebook
  • Follow Edgeware on Twitter
  • Like "At Home with Vicki Bensinger" on Facebook
Be sure for each "like" and "follow" to come back here and post a comment that you've done so.  This will increase your chances of winning.

I'm sorry but this offer is only available in the United States.  The winner will be selected at Random on Monday, October 15th around Noon central standard time.  

Be sure to leave a link to your contact information in the event you are the winner.  The winner needs to respond within 48 hours of notification or another winner will be selected.    Good luck!

The winner of the Better Zester from Edgeware was selected at Random on Monday, October 15, 2012 at Noon central time.  Of 48 comments number 33 - SusiTravl was selected.  Congratulations Susi.  Please contact me within 48 hours to claim your gift.


As I mentioned earlier I made a Cranberry Orange Bread using my Better Zester.  This bread is delicious with coffee or tea in the morning, or even a mid-day snack.  Better yet, bake some to wrap up to give as gifts, and attach a Better Zester with it.  Who wouldn't love that!

For the Cranberry Orange Bread recipe read below.........

Cranberry Orange Bread
yields 1 loaf

2 cups flour
1 1/2 teaspoons baking powder
pinch of salt
2 tablespoons, unsalted butter, melted
1/4 cup Grand Marnier
1 egg, well beaten
2 cups fresh cranberries, coarsely chopped
1 cup sugar
1/2 teaspoon baking soda
juice and zest from 1 orange
water
powdered sugar

Preheat oven to 350F degrees.  Sift flour, sugar, baking powder, baking soda and salt together.  In a separate measuring cup, combine the orange juice, zest, butter, Grand Marnier and enough water to make 3/4 cup liquid.  Stir in egg.  Mix liquids into dry ingredients until just blended.

Spray an 8x4 inch loaf pan with non-stick spray.  Pour batter in pan and bake in preheated 350F degree oven 50-60 minutes or until toothpick inserted comes out clean.  Allow to cool 10 minutes in pan.  Remove from pan and sprinkle with powdered sugar if desired.  Serve.


ENJOY!!!


Sunday, 7 October 2012

Gourmet Chocolate Caramel Apple!


Nothing screams fall to me like a St. Louis  Merb’s Bionic Caramel Apple.  Ever since I was a little girl I couldn't wait for October to arrive.  I’d march over to the grocery store and pick up a Merb’s Caramel Apple, covered in a thick, rich, creamy, gooey, caramel, and coated with fresh roasted pecans.  It’s heaven on a stick!
For years I've tried to duplicate their recipe, but this year I decided to create my own decadent apple.  If you love chocolate like I do, then you’ll adore my Gourmet Chocolate Caramel Apple.  Your dentist will be thrilled you tried one!  Here's my recipe:  

Gourmet Chocolate Caramel Apple
makes 4-6 apples
Ingredients:
  • 2 cups heavy cream
  • 10 1/2 oz. fine-quality bittersweet chocolate (no more than 60% cacao), finely chopped
  • 1 3/4 cups sugar
  • 1/2 cup  Lyle's Golden Syrup
  • 1/4 cup water
  • 1/4 teaspoon kosher salt
  • 3 tablespoons unsalted butter, cut into tablespoon pieces
  • 6 Granny Smith Apples, stems removed
  • Candy apple sticks
  • Special equipment:  candy thermometer
 Directions:
Bring cream just to a boil in a 1- to 1 1/2-quart heavy saucepan over moderately high heat, reduce heat to low and add chocolate. Let stand 1 minute, stir until chocolate is completely melted.


Remove from heat.

Bring sugar, corn syrup, water, and salt to a boil in a 5- to 6-quart heavy pot over moderate heat, stirring until sugar is dissolved.


Boil mixture uncovered, without stirring, but gently swirling pan occasionally, until sugar is deep golden, about 10 minutes.


Tilt pan and carefully (can splatter and burn you) pour in chocolate mixture (mixture will bubble and steam vigorously). Continue to boil over moderate heat, stirring frequently, until mixture registers 255°F on candy thermometer - about 20 minutes. (Times will vary depending on the climate in your room.)


Note: Do not rush this step.  It may feel like it takes a long time for the caramel to reach this temperature, but if you rush it by turning up the heat, you will burn the caramel, and waste all your ingredients.  Be patient, and you’ll be thrilled with the results.

Add butter, stirring until completely melted. Pour into a heatproof bowl (do not scrape any caramel clinging to bottom or side of saucepan), and set caramel aside to cool for approximately 5 minutes.

While caramel is cooling, insert candy apple sticks into (center) stem end of apple. Holding an apple by the stick, dip and roll it in the chocolate caramel until evenly coated, letting any excess drip back into the bowl. (If caramel runs off quickly and the coating seems thin, it’s too hot.  Let cool a minute longer and try dipping again).
If desired dip coated apples in chopped pecans, toffee chips, or drizzle with melted white chocolate.  Can be refrigerated for several days.   

To give as a gift place in plastic gift bag, and tie a ribbon around the stick to keep bag closed until gift-giving!

ENJOY!!!


Monday, 1 October 2012

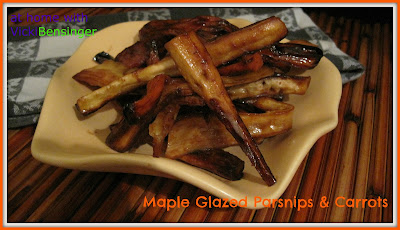
Maple Glazed Parsnips and Carrots!


I love Fall, and particularly the color of the vegetables at the market this time of year.  I have to say though, my family is so addicted to butternut squash, that I find I make that most of the time.  Root vegetables are at their best in fall and winter, so I decided to pick up some carrots and parsnips in lieu of butternut squash.

Carrots are best known for their rich supply of the antioxidant nutrient - beta carotene, but also for a wide variety of antioxidants and other health supporting nutrients.  Carrots have been found to benefit the cardiovascular system, vision health and cancer - specifically, colon cancer.

When selecting carrots, roots should be firm, smooth, relatively straight and bright in color.  The deeper the orange color, the more beta-carotene present in the carrot.  Avoid carrots that are excessively cracked or forked as well as those that are limp or rubbery.  In addition, if the carrots don't have their tops attached, look at the stem end to insure that it's not dark - this is a sign of age.  If the green tops are attached, they should be bright colored, feathery and not wilted.  Since the sugars are concentrated in the carrots' core, generally those with larger diameters will have a larger core and be sweeter.

Parsnips also a root vegetable are similar to carrots, although lighter in color.  They are rich in fiber and potassium.    Fiber promotes healthy digestion, helps regulate blood sugar levels, makes us feel full, and may help reduce cholesterol levels.  Parsnips are also low in saturated fat, rich in vitamin K and C, and high in folate.  When selecting parsnips, look for characteristics similar to carrots, as described above.

Eating vegetables in the raw is always the best way to get all their nutritional value since cooking will strip them of some of their nutrients.  However, having a diet rich in vegetables and fruit is most important, even if you don't always eat them raw.

After purchasing my parsnips and carrots I wanted to prepare them so they'd be caramelized, just like when I roast my butternut squash.  I came across a recipe from Nigella Lawson that I knew my family would love -  Maple Glazed Parsnips   I decided to add the carrots for color since parsnips are creamy white.  Nigella's recipe make these root vegetables taste like candy.  Yum, they were so good! 

Here's the recipe.....

Maple Roasted Parsnips and Carrots
Adapted from Nigella Lawson
Serves 8

Ingredients:
  • 2 1/4 pounds parsnips and carrots (Approx. 1 1/8 pounds of each)
  • ½ cup canola oil (I used about 1/4 cup)
  • ½ cup pure maple syrup (I used about 1/4 cup)
Directions:
  • Preheat the oven to 400 degrees F.
  • Peel the parsnips and carrots then halve them crosswise, then halve or quarter each piece lengthwise.
  • Place parsnips and carrots into a roasting pan, lined with heavy duty foil. Pour the oil over the vegetables and mix them well so that the oil covers all of the pieces.
  • Pour the maple syrup over the vegetables and transfer the roasting pan to the oven. Roast the parsnips for 35 minutes, or until they are tender and golden brown.


ENJOY!!!