Pages

Friday, 9 July 2010

Low-Fat Banana Oatmeal Muffins


We try to eat extra healthy when we're out in the mountains so when our bananas looked like they were too ripe to eat I decided my daughter and I should try to make some low fat banana muffins. She said let's use whole wheat flour so with bananas, whole wheat flour and a combination of some recipes that I've made before we came up with these.

Of course it always tends to be a bit of a challenge baking at altitude. I read numerous articles on making the proper adjustments so they worked out perfect.

The recipe that I'm going to share is one that would be used at sea level.

These muffins turned out delicious. In fact, they were gone in no time at all. I said we try to eat healthy but sometimes we eat a lot!


Low Fat Banana Oatmeal Muffins
makes 12 regular or 6 large

Ingredients:

Dry:

1 1/2 cups Whole Wheat Flour
1 cup Oatmeal (old fashion)
1/4 cup brown sugar or white sugar
2 tsp. baking powder
1 tsp. baking soda
1/2 tsp. salt

Wet Ingredients:

2 eggs
1/2 cup natural applesauce
1/4 cup skim milk
1 cup mashed very ripe bananas

Mix dry ingredients together.

Then in a separate bowl beat eggs well and mix in applesauce, milk and bananas. Pour over dry ingredients and blend together. Batter will be lumpy.

Spray muffin tins with non-stick spray and fill 3/4 full.

Bake in a 400 degree oven for 20-25 minutes.

These are delicious plain, with butter, honey or even Whipped Wildflower Cinnamon Honey that I recently purchased at the Farmer's Market here in Colorado.

I hope you enjoy these delicious low fat muffins as much as we did.

Oh and by the way these photos look better. My daughter took them.

Wednesday, 7 July 2010

Foods Aren't Just for Eating!

Americans spend millions of dollars each year on facials and purchasing skin remedies from their local pharmacies and department stores. However, for a fraction of the cost you can make your own skin care remedy right from your kitchen pantry with edible ingredients. These homemade formulas are inexpensive, free of harmful chemicals and best of all they actually work!


Banana Oat Wheat Mask (to moisturize your skin)

During the summer many of us tend to spend time outdoors exposing our skin to the sun, which causes drying and peeling. Bananas are naturally moisturizing and can soothe and hydrate sun damaged skin. While Nutmeg is a natural antiseptic, and whole wheat flour contains antioxidants providing added protection to the elements.

Ingredients:

1/2 very ripe mashed banana
2 tbsp ground oats or oat flour
2 tbsp whole wheat flour
pinch of nutmeg
milk or cream, add as needed

Instructions:

Whip ingredients together, adding milk or cream and oat flour as necessary to get a smooth paste-like consistency. Apply to face and leave on for 5-10 minutes. Rinse thoroughly and pat dry.


Honey Oat Mask

This gentle oil-absorbing mask is so easy to mix together. Oatmeal is perfect for all skin types. It's soothing, anti-inflammatory, and hypo-allergenic. While honey can strip damaged skin cells allowing for a rebirth of new tissue healing damaged skin. Plus adding some egg yolks for vitamin A can help with wrinkles, sun spots and even acne.

Ingredients:

1 tsp honey
1 egg yolk
oatmeal

Instructions:

Blend ingredients adding just enough oatmeal to form a soft paste. Apply immediately. Smooth mask on face and neck leaving on for 15 minutes. Rinse off with warm water and pat dry.


Fruit Juice Mask

Gentle and effective, this mask is perfect for renewing and brightening a dull complexion.

Ingredients:

1/4 cup Lemon Juice
1/4 cup Apple Juice
1/4 cup White Grape Juice
1/4 cup sugar (superfine will dissolve quickly)

Instructions:

Mix all ingredients or place in a glass jar and shake to combine. Apply to face with a cotton ball and let dry for 10 minutes. Rinse. Can be stored in refrigerator for up to 4 days.

If you have any food allergies to any of the ingredients listed above do not apply these masks.

Sunday, 4 July 2010

Blue Corn Encrusted Tilapia with a Raspberry Chipotle Sauce


As I mentioned in my previous post I was planning to have a Red, White and Blue meal for the 4th of July. However my family decided they wanted to grill some steaks today so that's what we'll be doing.

However, since I had planned to prepare Blue Corn Encrusted fish with a homemade Raspberry Chipotle sauce I decided to make it yesterday.

The dish turned out delicious and everyone loved it. However, I was the only one in the mood for fish so I made mine with Tilapia while I made the rest of the families with chicken breasts encrusted with blue corn chips.

Since we are out of town in Colorado I don't have all the tools I do at home so I decided to grill both encrusted chicken and fish on the bbq pit since the oven was in use and I was running short on time.

As I've mentioned in the past I'm in desperate need of taking a food photograhpy class. I'm sure I could have plated this dish to look more appealing but trust me it was delicious, tender and red (sauce), white (fish) and blue (corn chips).

The small towns in Colorado don't typically have the best fish but you can't really go wrong with Tilapia since it comes in frozen anyway. So, I purchased some Tilipia for myself while I got 4 boneless, skinless chicken breasts for the rest of my crew.

To encrust the chicken and fish this was all that was needed:

1 bag of Blue Corn Chips
egg whites or an egg (I used egg whites since we had those in the house)

Crumble or puree in the food processor the Blue Corn Chips. I divided the crumbled chips into 2 zip lock bags, one for the fish and one for the chicken pieces.

I then took some egg whites and brushed it over the chicken and fish. After coating with egg whites I took the chicken pieces one at a time and placed them in one of the zip lock bags, sealed and shook each piece until coated.

I placed each encrusted piece of chicken on a foil lined jelly roll pan coated with non-stick spray. Then sprayed the top of each piece of encrusted chicken with the non-stick spray. This helps for moisture and to brown the coating.

I did the same for each encrusted piece of Tilapia only placing them directly on the sprayed heavy duty foil sealing the top and sides.

Since I only had one oven to work with that was already in use I decided to put these all on the grill outside to cook. I placed the chicken on for about 15 minutes and the fish on for at most 6-8 minutes. All turning out perfectly cooked and moist.

Prior to preparing the encrusted fish and chicken I made the Raspberry Chipotle sauce. This made about 2 cups and was so tasty. It had a bit of a kick to it but if spice isn't a problem then go with the recipe I have posted below. Otherwise you may want to use a little less of the Chipotle Peppers in Adobo Sauce.

This sauce would also taste great over Salmon, as a dip for chips or veggies or whatever else you can think of. It was so delicious and beats purchasing the ready-made jarred versions with as simple as it was to prepare.


Raspberry Chipotle Sauce
makes 2 cups

2 cups fresh raspberries, rinsed and drained
1/4 cup chipotle peppers in adobo sauce, chopped
1 clove garlic, minced
1/2 medium red onion, minced
1 red tomato, diced
1 tbsp. brown sugar or agave nectar
1 tbsp. lime juice
1 tbsp. raspberry jam
salt and pepper
2 tbsp. extra-virgin olive oil

Heat all ingredients in a saucepan for approximately 15 minutes. Cool for a few minutes and place in a food processor or blender to puree or rough chop (whichever consistency you prefer)

Serve warm or chilled.

Enjoy!

Happy 4th of July!

Friday, 2 July 2010

4th of July Celebrations!


Well I have to apologize for not posting anything for over a week. I had good intentions to post a video that I made but had some computer problems and was unable to post it before going out of town. So if I can figure it out I will post it at a later date.

In the meantime I am spending some time in the Colorado Mountains and loving the view here as I blog.

I spent the day yesterday biking for 4 hours through the mountains and decided that I'd take a break this morning for a much needed post on my blog.

It's hard to believe that the 4th of July is just 3 days away. Where has the time gone? It seems like just yesterday I was blogging about the new year arriving.

I know most of you will be celebrating the holiday with family and friends for lunch or dinner then going out to see fireworks. I love to watch fireworks. In fact when my kids were younger we would go down to the riverfront and watch a HUGE display. My favorite of course was always the finale. The worst part was if you had to use the restroom especially with small children. Having to wait in line to use a port-o-potty was not my idea of fun especially in 100 degree weather with the humidity to match. However, that is what the 4th of July is all about.

Now of course we go to a local golf course not far from our home where we could get there just before the fireworks started and be home in minutes to use the potty.

This year we will watch them in the mountains, a beautiful backdrop for all the fireworks with little humidity.

Anyway, I've been thinking of all the fun things to prepare to celebrate the Fourth of July from fun treats, breakfast ideas to entrees. I came up with a list of things in the event you're still trying to come up with ideas.

For fun festive treats:
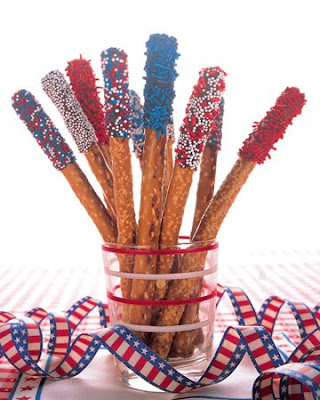


Pretzel Sparklers - To make these just take pretzel rods and melt some white chocolate in a double boiler. Dip 1/2 of the pretzel rod in the chocolate and then sprinkle with red, white and blue sprinkles. Lay on parchment to dry. Then stack together in a nice vase for everyone to have.


Red, White and Blue Strawberries - To make these melt white chocolate again in a double boiler. Then dip 2/3 of the strawberry in the chocolate and dip the bottom 1/3 that's been covered in the white chocolate in blue sanding sugar. Now you've got a red, white and blue strawberry. Arrange on a platter with your sparklers in the middle if you like.

If you're more of a breakfast person why not make some pancakes using a large star for the mold. Add some blueberries to the batter and cook. After cooking you have a blueberry star pancake and top with strawberry or raspberry syrup. Now you have a fun festive 4th of July pancake.

If pancakes are too heavy for breakfast a simple healthy parfait with vanilla yogurt layered with blueberries and strawberries is always beautiful and delicious.


For dessert - make some sugar cookies either in a star shape, iced and covered with red, white and blue sprinkles or make butter cookies in the shape of a rectangle, covered with royal icing and then decorated with gel colors to make the american flag. The kids would have fun making any of the above with you.

Trying to come up with a 4th of July entree?

I was trying to come up with something different this year and I decided I'd make fish. Of course I love fish and so does my family. So I've decided to take Tilapia, Snapper or whatever light white fish I can find here in the mountains and encrust it with Blue Corn Chips.

I'll either bake it lightly sprayed with non-stick spray or put it on the pit covered in foil to cook.

For the topping I'm going to make a homemade Raspberry Chipotle sauce to go over the top. I'll post the photo after I make it. However, I know Uncle Bob's also makes a great Raspberry Chipotle Sauce that you can heat up and put over the top of the fish as well if you don't feel like making your own.

If fish isn't something that appeals to your family then use this same idea and coat chicken or chicken fingers and use the same Raspberry Chipotle dipping sauce.

Be creative this 4th of July with your menu. Of course don't forget those star ice cube trays to add to any of the beverages you serve.

Have fun coming up with your own ideas or feel free to use any of mine.

Have a safe and festive holiday!

Monday, 21 June 2010

Exaco Ice Cooler - Bottle Chiller


Summertime is all about being outdoors and spending time with friends and neighbors. Whether that means having friends over for dinner, wine and a BBQ or going to someone elses home this is a fun way to dress up your table or bring to your friends house as a hostess gift.


The Exaco Ice Cooler - Bottle Chiller is fun to create and looks great on any table.


Now you can design your own beautiful bottle chiller - no experience required!


Freeze it with ornaments, fruits, food color, flowers or almost anything else you can imagine to make it uniquely your own creation!


Reusable plastic mold allows use for many years and many special occasions


Makes a great gift!


Also makes a great candle holder, combining the mystique of both fire and ice


When you're done using it, put it outside for the dogs to lick. Just like the "ice lick" I posted about last year. Of course if you have it decorated with things that aren't meant for dogs then it should probably go in the sink to melt.


If wine isn't your style then check out Fred Cool Shooters Shot Glass Mold. Think of how much fun you could have with these!


Just remember to make these at least 24 hours ahead of time so they have plenty of time to freeze.


I think these are a fun idea for the summer and their sure to be a great conversation piece.

Saturday, 19 June 2010

Pickled Cucumber Salad


Tomorrow is Father's Day and so many of you will be celebrating the day outdoors at the pool while lighting up the grill.

Here in Missouri the weather is hot and humid and nothing hits the spot better than something nice, cool and refreshing. So to go with your burgers, steaks, chicken, fish or whatever entree' you're preparing it's always nice to have a chilled salad and fresh squeezed lemonade or limeade to go with your meal.

I love cucumbers so I thought I'd share with you a Pickled Cucumber Salad. It's so nice and light plus very refreshing. Perfect on a warm summers day. In addiion don't forget to try out the Ice Cream Casserole that I posted the other day. They're both sure to be a hit at your bbq tomorrow.

I hope everyone has a wonderful time with their dads and grandfather's.

Pickled Cucumber Salad
serves 16

2 large English Cucumbers, thinly sliced (use a mandoline and it will go quickly)
2 teaspoons salt (I use Kosher salt)
1 cup distilled white vinegar
3/4 cup sugar
1/2 cup chopped dill or parsley
1 medium red onion, thinly sliced (optional)

Place cucumbers on a rimmed baking sheet; sprinkle with salt. Let stand at room temperature for 2 hours. Drain. Whisk vinegar and sugar in a large bowl until the sugar dissolves. Add cucumbers, dill (or parsley) and onion, if desired. Season wth pepper; toss to blend. Place in refrigerator for 2-8 hours for the flavors to meld. Transfer to serving dish.

The photo of the salad above is 1/2 the recipe that's posted.

Thursday, 17 June 2010

Father's Day Ice Cream Casserole


This weekend is Father's Day. Many of you will have your families over with generations of dads and grandfather's. So I thought it only right to devote my next few posts to our dads and even those like myself who wish their dad was still around so that we could shower them with lots of hugs and kisses.

Although my dad is no longer living and my husband will be at a biking event I still like to think about all the fun things to cook up and buy for Father's Day. So why not share them with you, my readers, in case you're still trying to come up with a menu, gift or idea of how to celebrate the day.

Thinking back when I was a little girl, Father's Day always started off eating a big breakfast with my dad, mom and 2 sisters. Then we'd hang around the house listening to Big Band music, Benny Goodman, Frank Sinatra, Dean Martin, Cole Porter among many others, while my sisters and I would take turns dancing with my dad in our family room. We had so much fun. I miss those days and with the 21st anniversary of his passing June 26th, one month prior to the birth of my daughter, it definitely brings tears to my eyes as I go down memory lane.

On the bright side though, he was the greatest dad ever and I feel fortunate to have had so many wonderful years with him.

Father's Day for us was either going out to dinner to The Tenderloin Room at The Chase Park Plaza, a favorite of my dads, or having a simple family BBQ at home with steaks, potatoes, salad and dessert. My dad was definitely a meat and potatoes kind of guy. Most were back in those days before we knew so much about nutrition.

One of the desserts I use to love to make and still do to this day is an Ice Cream Casserole. Although now I use yogurt instead of ice cream. Below is the recipe for you to try. Feel free to doctor it up anyway you choose but this is the version I've made for years. Let's face it everyone loves Oreo's so check out my recipe and give it a try for this Sunday or for dessert any day of the week.

This dessert stores for weeks in the freezer and best of all, if you don't care about being fancy, prepare it in a tupperware container that has a lid. So after serving out portions of the ice cream casserole you can just pop the lid back on and place it in the freezer for the next time. Of course you can also prepare it in a springform pan and show off your luscious frozen treat!

Ice Cream Casserole
Serves 15-20

For crust:

¼ cup (1/2 stick) butter, melted
20 Oreo cookies processed in food processor or mashed well in plastic bag

For filling:

½ gallon vanilla ice cream, cookies and cream or yogurt
6 heath bars, broken into pieces

For sauce:

¼ cup (1/2 stick) butter
1 (6 ounce) package semi- sweet chocolate chips
1 (5 ounce) can evaporated milk
1 cup powdered sugar
1 teaspoon vanilla

To prepare pie crust:
Mix melted butter and wafer crumbs together; pat into a 9-by-13-inch pan (Tupperware container with lid works well). Place in freezer until cold.

To prepare filling:
Soften ice cream; mix with Heath bar pieces. Spread softened ice cream mixture over cold crust. Return to freezer.

To prepare sauce:
Melt butter and chocolate chips in saucepan over low heat. Stir in evaporated milk and powdered sugar. Cook, stirring constantly with wire whisk or wooden spoon, until mixture thickens. Remove from heat; stir in vanilla. Let cool to room temperature.

When ice cream in pan has hardened, pour cooled sauce over top. Return to freezer. Cut into squares to serve. (If using a springform pan remove the sides and slice into wedges).

Note: Allow ice cream layer to freeze solid before pouring on the sauce.