Pages

Thursday 27 September 2012

Apples & Cream Cheesecake!


Apples are everywhere this time of year, in fact it's the perfect time to go apple picking if you're into that sort of thing.  We love it, and my daugther who is 23 has been asking me all week if I'd like to go. So it looks like we'll be setting a date to head over to Eckerts soon.

This month the 5 Star Makeover challenge was to make something using apples - the perfect fall fruit, IMO!


For years I've been making Peaches and Cream Cheesecake.  If you can believe it, this is a recipe I got from a friend in college - more years ago than I care to share.  It was so good I made it for my family, and to this day it's the only dessert they request I bring for family functions. 

This month since I had the 5 Star Challenge I decided to make it with apples.  Rather than using the semi-homemade ingredients typically used, I made it totally from scratch.  Still delicious, but takes a bit more time to prep.

I think you'll love this dessert.  If you're in a hurry and time is of the essence, then I've provided you with the semi-homemade version which is still to die for.  In fact, whenever I serve this at a function, of all the desserts, everyone asks me for this recipe - that's how good it is.  I hope you'll try it.  Here's the recipe....

Apples & Cream Cheesecake
Serves 6-8

3/4 cups flour
1 tsp baking powder
1/2 cup milk
1 egg
*3 ounces homemade dry vanilla pudding mix or 1 (3oz.) pkg. Dry vanilla pudding mix (not instant)

Combine ingredients and beat at medium speed until blended, about 2 minutes.  Pour batter into 9" springform pan that has been coated with non-stick cooking spray. Be sure to place foil under pan as some of the liquid could ooze out.

Apple Pie Filling – (can substitute 1 can apple pie filling)

5 apples peeled cored and sliced ½ inch thick or cubed (Granny Smith)
2 tbsp butter
1/2 cup sugar
1/8 tsp ground nutmeg
1/8 tsp cinnamon

2 tbsp flour

Melt butter in heavy pot; add apples and all remaining ingredients, except flour.  Partially cook fruit over low heat for 15 minutes, stirring occasionally.  Stir in the flour and set aside while preparing cream cheese mixture.

Cream Cheese Filling
1 (8 oz.) pkg. of softened cream cheese
1/2 cup sugar
3 tbsp  juice from cooked apples or apple juice 

Combine ingredients and mix on medium speed until well blended, approx. 2 minutes.
  • Take apple pie filling and spread evenly over batter.
  • Spread cream cheese layer over apples, covering entire surface.  An offset spatula works perfect for this.

 Combine
  • 2 tbsp sugar
  • 1 tsp. Cinnamon

Sprinkle cinnamon/sugar over cheesecake filling.

Bake in 350 degree oven for approximately  30-35 minutes or until bubbling around edges.


Can be served warm or cold.

* Homemade Dry Pudding Mix
   makes 3 cups

Ingredients:

1 1/2 cups nonfat dry milk powder
1/2 cup sugar
3/4 cups powdered sugar
1 cup sifted cornstarch
1/2 teaspoon salt
2 teaspoons vanilla powder

Combine ingredients and store in an airtight container.

Note:  This recipe can easily be doubled.

ENJOY!!!


Monday 24 September 2012

Homemade Vanilla Extract!


The holidays will be here before you know it.  If you receive my monthly newsletter then you're aware that the next few months I plan to share recipes for homemade "gifts from the kitchen," that you can give as a hostess, shower or holiday gift. 

Most of us enjoy giving gifts to family, friends and co-workers during the holiday season, but with the economy in the toilet it makes it a bit harder on the pocketbook!  However, creating homemade treats is not only affordable but it tastes better.  Plus, you can afford to give to everyone on your holiday list and then some, and still have money leftover to throw a party!  

Last week I shared how to make homemade Limoncello.  Today I'm going to share how to make Homemade Vanilla Extract.

If you're a baker then you know how often you use Vanilla Extract.  Pure Vanilla Extract which is what I'll be sharing with you, can be $10-$15 for a 4 ounce bottle.  To make your own it's a fraction of the cost.  Plus, I even had labels made for mine - I'll share that with you in a minute.

Homemade vanilla extract is so easy and fun to make. It's not as strong as the store bought varieties but will have a fuller and fresher flavor. The best part though, is knowing you made it yourself. 

It doesn't matter what alcohol you choose for making extract - it's more a question of which alcohol you prefer. The flavor of Vodka doesn't interfere with the taste of the vanilla and is what you'll typically purchase in the stores.  However, Rum or Brandy can also be used and are nice if drizzled over freshly baked cakes or added to stewed winter fruits.

When I decided to make homemade vanilla I opted to order amber colored glass bottles from Specialty Bottle Company, although you can purchase Vintage Bottles which can be fun, or clear bottles.  Since you're making these yourself, whatever bottles or vessel you choose is up to you.

For the Vanilla Beans I purchased in bulk, which saves you quite a bit.  I ordered 50 Madagascar Vanilla Beans from Beanilla for a mere $38.99. I love the aroma of the Madagascar Vanilla Beans and prefer those for making homemade extract and to use when baking.  If you're partial to another type, Beanilla offers a variety to choose from.

Madagascar Vanilla Beans are superior, with flavor and aromatic qualities that make these beans the most popular and sought after vanilla variety. The flavor is rich, dark and creamy with an overwhelming sweet, buttery aroma. These are well suited for many baking recipes, drinks and desserts. To learn more about the various vanilla beans; the best types, how to store them, how to use them, how they're graded and what makes them different, view here.

Of course, to make your gift complete there's nothing like a fancy label to adhere to your bottle.  If you're talented you can easily make your own.  However, if you're like me and don't have the time or don't have the technical skills, you'll love going to My Own Labels.  They literally have labels for everything.  

Be sure to check out each of these sites. I'm sure you'll have fun browsing and may even find something you like, whether for Homemade Vanilla Extract or some other gift your creating.

Below is the recipe for Homemade Vanilla Extract - I hope you have fun with it!.............. 


Homemade Vanilla Extract

Supplies Needed:


Labels (optional)

Vodka
Vanilla Beans (I used Madagascar)
Bottles with a tight fitting lid
Scissors or paring knife
funnel

Directions:
Split vanilla beans lengthwise (using a scissors or paring knife), down the center to expose the seeds,


 keeping the ends of the beans intact. The seeds inside the vanilla bean are called the "caviar."


Place one full split bean, folded in half, in a 4 ounce bottle. I use one bean per 4 ounce bottle and feel it's enough.  If you like you can add 2 beans for a fuller flavor.

Note: Five beans per 16 ounces of alcohol is the ratio that the FDA requires for commercial production of a single-fold vanilla extract.  This ratio is the most important aspect of making homemade vanilla.


Using a funnel, fill with high-quality vodka, rum or brandy, covering the top of the beans.


Seal bottles and let steep for 6 to 8 weeks in a cool, dark place such as a pantry. Shake the bottle 1-3 times a week, until  ready to use. The extract will last practically forever.

Eventually, the beans will lose their strength, but they should maintain their flavor for many months.  Add more alcohol as needed to keep the bottle replenished - you will never run out of extract.  At some point you might want to add a couple of split fresh vanilla beans to the bottle.


ENJOY!!!


Monday 17 September 2012

Moist & Buttery Lemon Cake!

Last week I posted the recipe for Limoncello from Mamma Agata's cookbook, "Simple and Genuine."  Since I had lemons on hand I couldn't resist making her Lemon Cake that she has made over the years for many famous stars such as Humphrey Bogart and Lauren Bacall.  Apparently Bogey loved her lemon cake, just as I'm sure you will when you make it.

I think you'll agree this cake is moist, buttery and delicious!

Below is Mamma Agata's Lemon Cake recipe from "Simple and Genuine."  For more luscious recipes you can order her book here


Be sure to read this recipe through before beginning.  Mise en place all ingredients as well.

Dolce al limone di Mamma Agata
(Mamma Agata’s Lemon Cake)

300 gr or 1 1/4 cups sugar

250 gr or 2 sticks butter (1/2 lb), PLUS an additional 1.5 Tablespoons butter, to grease the pan

4 eggs

Grated zest of 2 large lemons (4 lemons, if small) - use organic whenever you can 

A pinch Sea salt

300 gr or 2 cups “00” Flour
16 gr or 2 tablespoons of Pan degli Angeli Italian baking powder
 (I used regular American baking powder)
125 ml or 1/2 cup whole milk

50 gr or 1/4 cup hazelnuts (finely chopped and toasted) (I omitted)
Lemonade Mixture:
300 ml or 1 1/4 cups water
Juice of 3 lemons

8 Tablespoons sugar
Instructions:
1 ) Pre-heat the oven to 175 degrees Celsius or 350 degrees Fahrenheit. Whip the butter in a mixing bowl on high speed for at least two minutes.
2 ) Add the sugar and continue to whip until a soft cream forms. Mix the baking powder into the flour and set aside.
3 ) Add the following ingredients to the mixing bowl, one at a time, and blend after each:
 
  • Eggs, one at a time,
  •  
salt, 
  • grated lemon zest
.


4 ) Alternate adding and blending the following ingredients into the mixing bowl: 
  • 
Flour and baking powder mixture and milk. In other words, add one quarter of the flour and blend; then, add one quarter of the milk and blend. Repeat this process until all of the flour and milk are blended into the batter.


5 ) Mix the ingredients on medium speed for about five minutes until the texture of the batter has a light and airy consistency (similar to a mousse). NOTE: Do not beat the batter for longer than five minutes after adding the baking powder.
6 ) Coat the surface of the fluted pan with butter before dusting it with flour. Shake off any excess flour before adding your cake batter to the pan. NOTE: This step creates a non-stick surface so that the cake will easily release from the pan and retain its shape.
7 ) Pour the batter into your greased and floured pan.
8 ) Bake the cake in the pre-heated oven for forty minutes.
9 ) While the cake is baking in the oven, prepare the lemonade mixture as follows.
10 ) Squeeze the lemons into a pitcher (or other container from which you can easily pour the lemonade mixture later). Add the sugar to the lemon juice.
 Mix until the sugar is fully dissolved in the lemon juice. Add the water.
11 ) Once the lemon cake is finished baking, let it sit for two hours outside the oven to bring it to room temperature.
12 ) Before we start this process, we want to ensure that the cake does NOT stick to the pan. In getting it to room temperature, the butter has solidified and that means there is a risk that the cake will stick to the pan. Here is the process just to ensure it does NOT stick to the pan before we proceed.
13 ) Place a plate on top of the pan. Tip the pan over and carefully shake the cake out of the pan. Immediately, place the cake pan back onto the cake. Carefully turn the pan back over. Remove the plate to expose the cake. This will seem like we have done nothing, but what we have done is to ensure that the cake will not stick later when we are ready to plate it.
4 ) NOTE: If the cake does seem like it wants to stick, you will need to place the cake back in the oven for a few minutes, just to warm the butter, and it will release from the pan easily.
15 ) Now it is time to add the lemonade mixture to the cake – that is what makes it so moist.
16 ) Over thirty minutes: Slowly pour a little bit of the lemonade mixture all over the cake in the pan every ten minutes (i.e. three times in total). This will allow the cake to absorb the lemonade mixture very slowly. You should NOT have used all of the lemonade mixture at this point.
7 ) After thirty minutes, tip the lemon cake onto a serving plate and add the remaining lemonade to the top of the cake, distributing it evenly all over the cake. NOTE: If you feel that the cake is still too dry, you may make a little more of the lemonade.
18 ) Garnish the cake with finely chopped hazelnuts and enjoy!
This recipe looks more complicated than it is.  Just be sure to read through the entire recipe 1-2x before starting.  If you love lemons you'll adore this cake.
Enjoy!


Monday 10 September 2012

Giveaway & How to Make Limoncello!


In June of 2007 we took an extended vacation to Italy. We started in the northern part of Italy - Milan, and made our way to the southern tip of the Amalfi Coast - Sorrento. Exhausted by the end of the month, the Amalfi Coast was the perfect setting for relaxation.

The turquoise waters were breathtaking and crystal clear.  We traveled by boat or ferry to many of the nearby islands for a taste of what each had to offer.  Universal, was the famous Limoncello (Lemon Liqueur), displayed in every shop on the coast in tall skinny neck bottles, with bright yellow liqueur filled to the brim.  Lemons grow in abundance on the Amalfi Coast and Limoncello is just one of the many things they use them for.

A famous culinary school in Ravello on the Amalfi Coast is Mamma Agata's Cooking School.  Although I was unaware of her school at the time, I was fortunate enough to discover it online years later.  I hope to make my way back someday soon to take one of her classes, and even arrange a culinary tour where others will join me.

Mamma Agata's cooking course is held in a state-of-the-art outdoor kitchen on a terrace in Ravello. The town of Ravello is located high above the Amalfi Coast, with views that stretch to Capri and beyond.


It is a town famous for its music and culture as well as gastronomic events.

Mamma Agata has a vast experience in traditional southern Italian cuisine.


Her life experience includes cooking for both Italian Heads of State and American celebrities that frequented Ravello in the 1950's and 60's, such as Humphrey Bogart, Elizabeth Taylor, and Jacqueline Kennedy and many others. She has been a private chef for international journalists, writers and politicians such as Susanna Agnelli.

Papa Salvatore married Mamma Agata in 1964.  They met at Villa Civita when Mamma was 14 years old, where Salvatore worked as a driver and a part-time gardener, and Agata worked as a personal cook. He later left Villa Civita to start a career as a waiter in a hotel restaurant.  After much hard work and long hours he became the Maitre d'hotel and continued in the business for more than 40 years.  It was with Salvatore's expertise gained through the hospitality industry that gave their family the essential knowledge, vital to opening the cooking school - which they call their Hidden Treasure.


Now Salvatore spends Monday through Saturday from 7:30am - 8:00pm working in the gardens with short breaks for lunch in the heat of the day, then still finding time to take care of their farm animials.  It is through his hard work, nurturing, passion, and devotion that their Hidden Treasure produces the most genuine organic vegetables, fruits and herbs, allowing Mamma Agata to create incredible dishes for her family, friends and guests.  Papa Salvatore is the families REAL TREASURE!

Chiara Lima, Mamma Agata's daughter, also lives in Ravello on the Amalfi Coast, where she teaches classes along with her mother, sharing her experiences with others.


Chiara is married to Gennaro who is the Sommelier of the family - with whom they share two lovely children - Mario and Paola.


Upon discovering Mamma Agata's cooking school I browsed their website and found they've published a beautiful cookbook that I'm thrilled to say I use in my kitchen to create luscious masterpieces, while reading their wonderful family stories at bedtime.  I feel like I know each member of their family, yet I've never met them.

I have communicated with Chiara numerous times and look forward to the day I finally meet her.  She is so warm and kind I feel like I've known her forever.  Everyone should be like Chiara!


Besides their cooking school and beautiful cookbook they also make their own olive oil, and pasta, among other items in their shop. I planning to make their Farmer's Spaghetti next, then drizzling the Extra-Virgin Olive Oil over the top - a dish I'm certain my family will adore.

With so many incredible Italian family recipes in this book, I'm finding myself like Julie Powell (Julie & Julia) following each and every recipe, page by page.  Recipes like Eggplant Parmesan with homemade tomato sauce, eggplant rolls (I love eggplant), stuffed zucchini flowers, Gnocchi - various versions,


numerous pasta dishes each one more tempting than the last, risotto, pork, veal, Mamma's famous Lemon Chicken, mouth watering meatballs in tomato sauce, vegetable dishes, her famous Lemon Cake and so much more.


Plus, their special Limoncello that I'm going to share with you today.

Even more, are the beautiful photos on every page, with stories to go with them.  I have to say, each time I see the photos of Chiara and Gennaro's children displayed throughout the pages of this book, I smile.  They are positively beautiful and look so sweet.

I can't say enough about Mamma Agata "Simple and Genuine" cookbook.  I love every page, photo and story that is shared.  It's truely a book to cherish!

I'm excited to tell you that Chiara was kind enough to let me offer one as a GIVEAWAY today!

However, if you don't win, you can always purchase a signed copy of Mamma Agata "Simple and Genuine" directly from Mamma Agata in Ravello, Italy.  Plus, if you'd like to see Chiara and Gennaro cooking, you can view their videos here.

Here's what you need to do to enter the GIVEAWAY:    Plus read more for the Limoncello recipe!


  • "Like" Mamma Agata on Facebook
  • "Like" At Home with Vicki Bensinger" on Facebook & Pinterest
  • Tell me what your favorite Italian dish is - (MANDATORY)
By commenting each time that you did one of the above, it will increase your chances of winning.

The winner will be selected at Random on Sunday, September 16th.  Be sure to leave a link to your email address so I can reach you, in the event you are the winner.

I won't keep you in suspense any longer.

I decided to share Mamma Agata's recipe for Limoncello today, since the holidays are just a little more than 3 months away.  I love gifting homemade treats for the holidays, they mean so much more than store bought.  Plus, it's an affordable way to give to so many, and with great results.  I know you'll love this for yourself and to share.
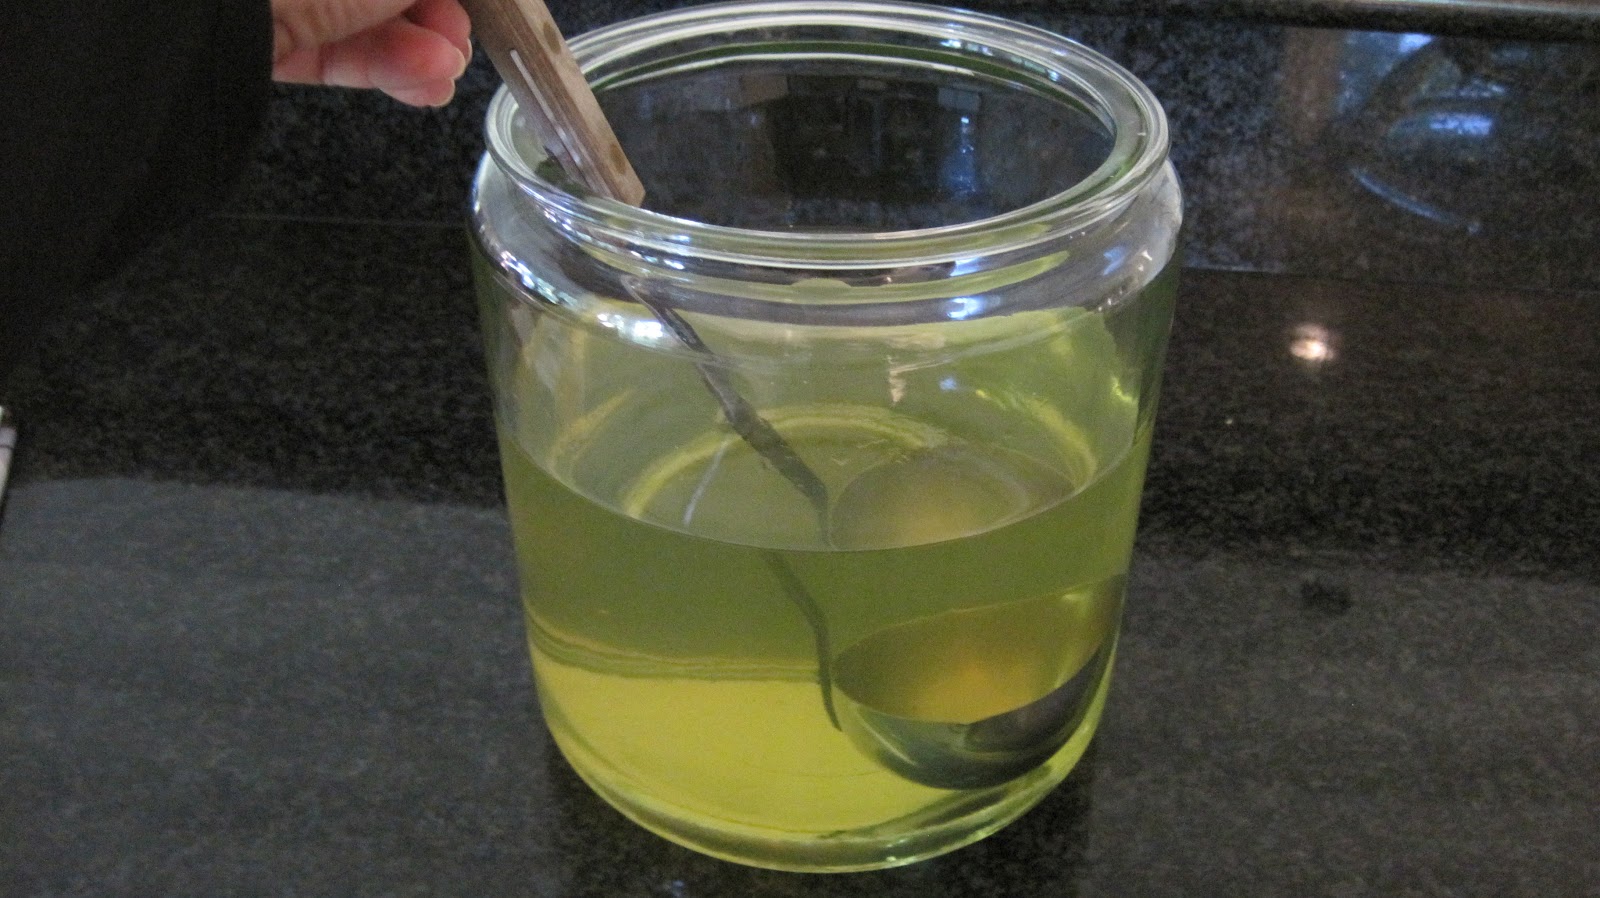
Homemade Limoncello


You will need a large glass jar

Ingredients:
  • zest of 6 or 7 large organic lemons
  • 1 litre or quart of pure grain alcohol or vodka
  • 5 cups (1250 ml) water
  • 3 cups (700 gr) sugar


Instructions:
Peel the zest from the lemons with a vegetable peeler and place them into a large glass jar.


Try to avoid the bitter white pith of the lemon skin, under the yellow zest.

Add the alcohol to the jar with the lemon zest.


Cover the glass jar with plastic wrap and store it in a cool place for 7 days.

On the sixth day: 
  • Boil the water and add the sugar to the boiling water (creating simple syrup).
  • Stir the sugar until it is fully dissolved in the water. 
  • Set the sugar syrup aside to let it cool over night.

On the seventh day:


Strain the lemons peels from the alcohol and discard the peels.


    Pour the sugar syrup into the glass jar with the alcohol and stir well.


    Serve chilled, from the refrigerator or freezer.


    NOTE: This Limoncello will keep for one to two years. Store the Limoncello in bottles with a cap or cork in your bar or cellar. When you want to drink it, chill the Limoncello in the refrigerator or freezer before serving. 


    ENJOY FOR YOURSELF OR TO GIVE AS A GIFT!


    Congratulations!  The winner of the giveaway is:
     Savoring Time in the Kitchen.  


    The winner was selected at Random and although it  shows 41 comments I posted 3 replies so there were actually only 38 comments.

    Thank you for all your comments.  Mamma Agata's book "Simple and Genuine" is a beautiful book that I recommend to purchase for yourself or a gift.

    Happy Cooking!